|
IMPORTANT DISCLAIMER: These
drawings and instructions are for reference purposes only. They are
not guaranteed to be without error. Always check local building codes and acquire
all applicable permits before building on your property. These plans
are not meant to be a substitute for an experienced and qualified
building contractor's advise
or plans.
Kurt Leucht shall not be held responsible for any damage to persons
or property caused either directly or indirectly by the use of these plans.
By using these plans, you are agreeing to the terms outlined above.
Just click on the images to view larger versions of them!
(I used free DesignWorkshop Lite to build the 3D shed plan models and to create all of these plan drawings.)
 |
I started out with
three 12 foot 4 x 4 posts that were treated for ground contact. I spaced them
out about 3 feet apart on center. I would suggest placing some sort of heavy-duty
weedblock down on the ground and then some gravel in order to have a solid
base (other than soft ground) to build on. I built my shed on these skids
so that it could be moved someday if required. You could also start building
on a small concrete slab if you wanted to. |
 |
Each of the 4 x 4 posts
was tapered on each end using a reciprocating saw. This will allow the
shed to be dragged across the ground more easily if it is ever moved.
Also, a hole was drilled through each end. This hole will allow a pipe
to be run through all three skids on either end of the shed, which will
ease the pulling of the shed if it becomes necessary to move it someday.
I would suggest putting the pipe through these holes now, before weather
has had a chance to twist and warp the posts. I speak from experience!
|
 |
Treated 2 x 4 studs were
used for the floor joists. Installed 16 inches on center, ten 8 footers
are needed for these floor joists. They must be cut down to 7' 9" in length so that
when we add the header joists on either side, the completed floor box will sit at an even
8 feet width.
|
 |
Verify that the
floor joists at four and eight feet from either end are centered on that four
or eight foot measurement from the end. This is exactly where the seam of the 4' x 8' flooring plywood
will fall. These two floor joists will each be shared by two pieces of
plywood, so it's very important that they be in their correct position.
Otherwise the floor plywood may not end up resting correctly on the floor joist.
|
 |
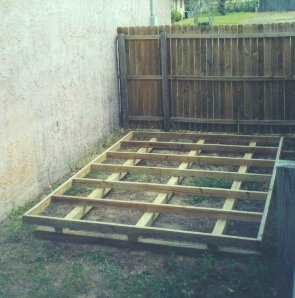
The floor box is complete
after adding two treated 12 foot long 2 x 4 studs as the header joists on
either side. The outside dimensions of this floor box are now 8 feet by 12 feet
even. |

This is what it looks like so far!
(Note that I used 24" spacing instead of 16" spacing for my floor joists. But if I
had to do it again, I would go with 16" spacing for greater rigidity of the floor.)
 |
Three 4' x 8' sheets
of 1/2 inch or 3/4 inch treated plywood complete the floor of the shed.
I used 1/2 inch on my shed, but 3/4 inch plywood would have given me much better
floor rigidity with my 24 inch floor joist spacing. It's better to over-engineer
these things than to under-engineer them. Wouldn't you agree!?!
|
 |
The rear wall can
now be built. Non-treated 2 x 4 studs were used for all the walls. The top and
bottom plates are exactly 8 feet long and the wall studs for my shed are 4' 10", but wall height
may be adjusted for your unique application.
Longer rear wall studs will simply give the rear roof less pitch and give
you more interior storage space. I chose this height in order to make the
rear wall drop down below the height of the yard fence that the shed is
backed up against. Note that the wall studs
are doubled on each end. This will provide both extra strength, and also
give us more surface to nail the first side wall stud to. I used 24" spacing
for the wall studs in my shed, but you may feel like over-engineering and
making it 16" stud spacing instead.
|
 |
The rear wall can
now be stood up, aligned, and nailed along the bottom to the floor. Using
a level, verify that each end of the wall is vertical, then use braces
on each end of the wall in order to hold it vertical. |
 |
The braces can be
just scrap pieces as they are only temporary. At the top of the brace,
make sure that it doesn't protrude outside of the rear wall space. At the bottom
of the brace, it should be nailed to another piece of scrap which was nailed
to the floor. |
 |
This view from the
top looking down at the left side brace simply shows that the braces need
to be angled away from what will become the side wall. This will allow
you to build the side wall without the brace being in your way. These and
other temporary braces will be removed only after all of the plywood siding
is installed. |
 |
You will want to nail another brace in the diagonal direction in order to
hold the wall perfectly square.
Just make sure you level the wall up before nailing the brace.
|

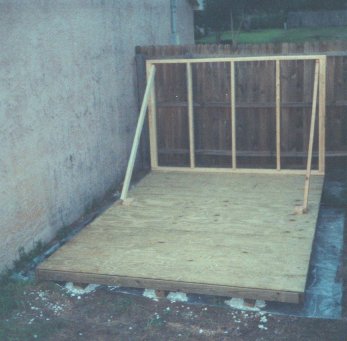
This is what it looks like so far!
(Note that I put down clear plastic on the ground, then put some gravel underneath the three skids.
A heavy tarp will last longer than plastic for keeping critters from burrowing and grass and weeds from growing.
And the gravel gives a more solid base than the soft & shifting Florida sand that I have to work with in this area.)

|
The front wall can now be built.
The top and bottom plates are exactly 8 feet long and the two end wall studs
for my shed are 5' 10".
The front wall is a bit more complex than the rear wall was so pay close attention.
The wall studs are doubled on each end like the rear wall was, but the butted wall stud is
actually holding up a header beam so it is 3.5 inches shorter than the end stud
(or 5' 6.5" instead of 5' 10").
The header beam is made up of two studs that are nailed together.
These studs are rotated 90 degrees from the orientation of the top plate
so that they form a strong beam.
This beam orientation is necessary to support the weight of the roof over the open doorway.
The length of the header beam is 3 inches shorter than the 8' top plate (or 7' 9")
so that it fits perfectly into the space left by the studs that are butted against the end studs.
The other wall studs are also doubled up so that they can support the weight of the hanging doors.
Simply leave about 12 inches of space between these doubled studs and the end doubled studs.
This should give you a rough door opening of approximately 5 feet wide.
The exact dimension of the door opening is not critical since we will be
making our own doors to fit into the space!
(IMPORTANT NOTE: I live in Florida and we never get snow here! If your shed must support more weight than just the weight of the roof materials, you should use 2x6's for the header beam instead of 2x4's!)
|

|
The front wall can now be stood up, aligned, and nailed along the bottom to the floor.
Using a level, verify that each end of the wall is vertical, then use braces
on each end of the wall in order to hold it vertical.
|

|
You will want to nail another brace in the diagonal direction in order to
hold the wall perfectly square.
Just make sure you level the wall up before nailing the brace.
|

|
Now you can build the center beam along with it's supporting members. There's not enough room on the floor of the shed to build it, so you'll have to build it somewhere else. The horizontal beam itself is made from two 8 foot 2x4's nailed together. (Use 2x6's for more strength in snowy areas.) The supporting members are also just doubled 2x4's that are 7 feet in length.
|

|
The center beam can now be installed, but you'll need at least two people to install it.
Be sure to center the base of the supporting members exactly four feet from the front of the shed.
This way, the edge of a 4' x 8' sheet of siding will fall down the middle of the supporting members.
Using a level, verify that each supporting member is vertical, then use braces
to hold them in the vertical position.
|

|
You will want to nail another brace in the diagonal direction in order to
hold the center beam and supporting members perfectly square.
Just make sure you level it up before nailing the brace.
|

|
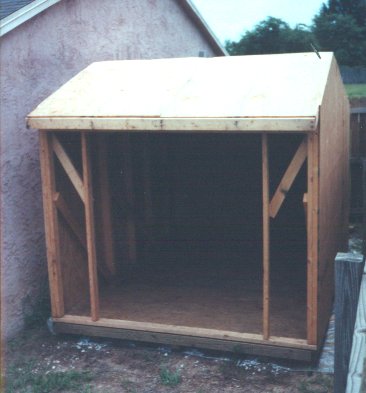
Now it is time to install some rafters for the roof.
Hold one 2x4 up into position on top of the rear wall and the center beam. Then mark the position of the back of the rear wall and the back of the center beam onto the 2x4. Then you can cut notches out of the 2x4 to allow it to sit squarely on top of the rear wall and center beam. Both ends of the 2x4 also must be cut at an angle that is actually vertical when the 2x4 is installed at the angle of the roof. Make sure to allow about 8 or 10 inches of length to stick out beyond the rear wall. This will give your roof a nice overhang. Once one 2x4 is cut correctly and fits properly, you can use it as a template to mark and cut the rest. Space your rafters directly over each of the rear wall studs, either 24" or 16" on center.
|

This is what it looks like so far!
THIS PAGE IS STILL UNDER CONSTRUCTION! SORRY!
Next step will be to do the front set of rafters just like you did the previous ones.
Then install an 8 foot 2x4 across the ends of the rafters both in the front and in the back of the shed.
Then install plywood on the roof and also on all the walls except the front wall which is the door wall.

This is what it looks like so far!
Next step will be to install plywood on half the front wall. Make sure you center the plywood seam in the middle of the door area.
Then cut out the door area plywood flush with the 2x4 frame. You now have half the door in your hands.
Attach two 2x4s together with a long piano hinge. They should be about 7 inches longer then the height of the doorway opening.
Attach the cut out door plywood along the length of one of the above 2x4s. It should be centered in height and cover the first 2x4 all the way to the hinge point. Yes, this plywood will lay on top of the flat part of the piano hinge. Set it back into place in the doorway opening and shim to even out the air gaps. Then attach the other 2x4 to the door frame. Now you have one door.
Create other door the same way. Now add 2x4s around the moving door plywood pieces such that the 2x4s overlap the moving door plywood and the stationary door opening plywood. When the doors close, the 2x4s cover up all the air gaps and help the doors to close flush and also keep them from going past closed.
Add a latching/locking mechanism to the doors. I used an interior latch to hold one door tightly closed, then used an exterior lock to lock the second door to the first door.
Shingle the roof and paint the exterior plywood to keep moisture off of it, and you're pretty much done!
IMPORTANT DISCLAIMER: These
drawings and instructions are for reference purposes only. They are
not guaranteed to be without error. Always check local building codes and acquire
all applicable permits before building on your property. These plans
are not meant to be a substitute for an experienced and qualified
building contractor's advise
or plans.
Kurt Leucht shall not be held responsible for any damage to persons
or property caused either directly or indirectly by the use of these plans.
By using these plans, you are agreeing to the terms outlined above.
|

|
|