This was a pretty easy project and it only took a little bit of wood. And it makes a simple and family friendly game that will keep you and you entire family entertained for years to come!
By the way, it’s called cornhole. Wikipedia is never wrong … well, not for long anyways. 🙂
To make two standard sized cornhole boxes you will need a total of 4, 8 ft 2×4’s and a half sheet of 1/2 inch plywood. I suppose you could use 3/4 inch plywood, but the boxes are pretty heavy with 1/2 plywood, so anything more is probably overkill. It’s probably a good idea to pay a bit extra for higher quality plywood so that you get a nice and smooth surface that won’t affect your gameplay adversely.
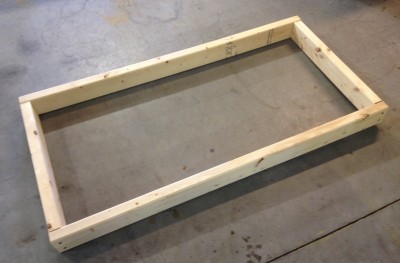
The first step in construction is to build the frame. The final outside dimensions are 4 feet by 2 feet. So cut 2 of your 2x4s in half so you have 4 boards that are 48 inches long. Then make 4 more at 21 inches. The 21 inch piece plus 1.5, plus 1.5 gives you the 24 inches you need for the final dimension of 4 feet by 2 feet. Nail or screw the boards together as shown below. I prefer screws that are at least 2.5 or 3 inches long for strength and long lasting holding power. To keep the wood from splitting, it’s a good idea to drill smaller pilot holes first and then insert the screws into the pilot holes. The photo shows one frame, but you will need to make two.
Then cut your plywood into 24 inches by 48 inches and install it onto the frame. I put a little wood glue on the frame for good measure but that’s optional. I also used screws to hold the plywood down solidly. Make sure your nails or your screw heads are down even or slightly below the surface of the plywood. Otherwise your bags could get caught on them.
The next step is to cut a 6 inch diameter hole into your plywood. According to standards, the hole needs to be centered left to right and the center of the hole needs to be down 9 inches from the top of the box. The best way to cut this hole is to drill through first with a large drill bit and then cut it out using a jig-saw.
The legs are probably the hardest part of this build. But they’re really not too difficult, though. The final height of the top of the cornhole box off the ground needs to be 12 inches when it’s all said and done. But we will start with longer legs and then cut them to the proper length as the final step.
[the below steps need some photos for clarity]
[Place leg vertically in place with a spacer, and clamp. Measure center of frame and center of leg. Drill hole clear through both. Remove leg. Cut a roundover on leg. Install leg with bolt, washer, washer, locking nut.]
That’s it for construction! Now it’s time to paint your cornhole boxes. Make sure you use wood putty to cover up the screw holes so you will have a nice smooth surface for the bags to land on. I would suggest painting your boxes with a quality semi-gloss outdoor paint to give a smooth glassy surface.
That’s all it takes to make a sturdy set of cornhole boxes! Now you just need to buy a nice set of cornhole bags at your local WalMart store or Amazon or your favorite arts and crafts store.
Now here is a bonus storage idea for your new cornhole boxes. In my garage, the rafters are exposed and they are 24 inches on center. So the 48 inch long boards will span across three rafters. See the photo below for one end of the storage idea.
And here is a photo of the other end of the storage idea. The idea is that you slide the box all the way into this end of the storage and the other end of the box slides up past the other end of the storage which is just a hair wider then the 48 inch length of the box.
Then once the box is fully up, you just slide the box till it sets against the other end of the storage idea. Both ends of the box are then supported. It’s hard to explain in words, but when slid all the way in one direction, the box is fully supported but when slid all the way in the other direction the box can slip past the support and come down.
Here is a close up photo of one end of the support.
And here is a close up photo of the other end. Maybe these close up photos will help explain the concept.
For safety, it might be a good idea to clamp the box against the support so it won’t move over time and fall down.
So that’s it! Two cornhole boxes along with a creative overhead storage solution that keeps them up and out of the way while also allowing quick and easy acess to them when you want to use them!
Thanks for reading this article! Feel free to leave any feedback or comments below!
Kurt


