Category Archives: Nature, Photography, Videos

The Case Of The Magically Appearing Fish Scale

Yesterday afternoon I was driving along a rural Florida highway just minding my own business when a single solitary fish scale appeared on my windshield.

I’m no detective, but curiosity got the better of me. Where did this fish scale come from? And how did it get on my windshield?

So I quickly I pulled over to investigate. I walked along the highway looking for clues.

All I found was a small mess of unidentifiable carcass lying on the road. It was fairly mangled, but I could clearly make out a few fish parts. Like fins. And tail. And meat.

So I quickly deduced that the fish scale which had suddenly appeared on my windshield had somehow come from this mangled mess of fish carcass.

But how?

And why?

I was at a complete loss.

Maybe you can help me solve this strange and complex mystery.

Below are some photos of the fish scale as it appeared on my windshield.

Now that I think about it, I did notice a big bald eagle launch out of a tall tree and fly overhead while I was walking back to my car after finding that mangled fish carcass.

Again, I’m no detective. But all clues seem to point to the following:

One, that this big bald eagle hates me.

And two, that he’s a really good shot!

Thanks for your interest!

Follow me for even more crack investigative work!

Kurt

Restoration of a vintage 8mm film projector

A few months ago, my wife and I found this beautiful old 8mm film projector at an antique flea market on Florida’s Gulf Coast. And it was very reasonably priced too. We thought it would look great displayed in our living room, and we were right!

This vintage projector reminds me of my grandfather, Kurt William Leucht, who came to America when he was 18 years old from Germany. Grandpa Leucht was very artistic and creative. As an adult, he got really into making home movies with his family and with his friends. So my family has quite a bit of old 8mm film from my grandpa.

This projector is a a Univex model PC-10. There is no manufacture date on the unit. Most online references say that these were manufactured in the 1930s, but I found one site that claims manufacture in 1947. My grandpa was 51 years old in 1947, so he could have actually owned a projector like this one.

The power cord was rubber and in very good shape, so I assume it had been replaced since the original cords were fabric covered. The motor worked fine and the lamp could not be tested since the bulb was burned out. I ordered a replacement bulb (BWY) online and it worked perfectly!

Surprisingly, this projector came with the original price tag from the manufacturer, Universal Camera Corporation! Universal Camera Corporation was founded in 1932 in New York. It manufactured still cameras, film, movie cameras, and binoculars until 1952, when the company declared bankruptcy. If we assume 37 bucks was the 1947 price, that would make the 2019 price close to $420.

This projector is actually pretty simple to understand. The sprocket at the top pulls the film off the reel and the sprocket at the bottom feeds the film into the temporary take-up reel. In between those 2 sprockets, the film is fed into a spring loaded gate which guides the film past the lens and the projector light. The film gets fed past the lens using a finger like gear that flips the film quickly to the next frame and then pauses while a rotating window opens up to let the projector light through.

It’s really cool that the lens is only held in place by spring friction. This allows you to twist the lens ever so slightly while pulling it away from the film or towards the film to change focus. This design also allows the lens to be removed easily for cleaning.

The internal gears were basically locked up due to aging and thickening of the original grease. But a single cover revealed the gear box and so I took apart each gear and cleaned and oiled them thoroughly.

Once the gears were all cleaned and oiled with a light machine oil, the projector worked perfectly! The two belts that run between the motor and the gearbox and take-up reel were made from flexible steel springs, so they were still in perfect shape. Had they been rubber or some other material, they wouldn’t have lasted 70+ years.

A complete instruction booklet came with this projector, although the pages were all separated from each other. My favorite old-timey phrase from this instruction booklet is “Read carefully the simple instructions which follow and you will add immeasurably to your pleasure.” Love it!

Another cool item that came with this projector was an old order form from 1946 that was used to order 8mm and 16mm films. That probably dates this projector to 1946. The film distributor was Castle Films, and the form just says to fill it out and mail the form to your local dealer. I’m assuming that local camera dealers probably kept the most popular reels in stock and ordered the rest as needed. Apparently Castle Films was pretty popular back in the day. My favorite old-timey phrase on this order form is “Remittance Enclosed Herewith”. Awesome!

These film reels were all black and white except for a small selection of color cartoons.

These Castle Films reels cost $1.75 for a 50 foot headline reel and $5.50 for a 180 foot complete reel. That’s more than 22 bucks and 71 bucks in 2019 money! Castle Films are still popular today and you can buy them on eBay for reasonable prices. Although depending on storage, the condition may be far from ideal. Film that was stored in a hot attic for 50 years will be brittle and will completely fall apart on you.

Thanks for your interest!

Kurt

How to make an awesome eclipse viewing rig!

Do you own binoculars?

Do you own a tripod?

If your answer to both of these questions is YES, then you have what it takes to create a pretty awesome, and completely safe, eclipse viewing rig!

Here are the step by step instructions!

Step 1

DO NOT look through the binoculars!  That is very very dangerous!

Step 2

Attach your binoculars to your tripod using any means necessary.  I used wood clamps but duct tape also works pretty good.  (Although it leaves a sticky residue.)

Step 3

NEVER EVER EVER look through the binoculars! You will destroy your retinas!

Step 4

Attach white paper or white cardboard a foot or so directly below the binoculars, with the binoculars pointing in the direction of the sun.  Again, I used wood clamps, but duct tape can also do this job.

Step 5

DON’T EVEN THINK about looking through the binoculars!  That’s a completely stupid idea!

Step 6

Cut a hole in some cardboard and place it over the binoculars to create a shade panel.  Now only the sun will be projected onto the white paper below the binoculars.  You can use the binocular’s focus capability to get the sun into perfect focus on the paper.

Step 7

That’s all.  There are no further steps.  Other than to NEVER look at the sun.  ESPECIALLY through binoculars.

Here is what the sun looked like today while I was setting up and testing my rig.  It looked really cool when thin wispy clouds flew by!

To get this photo, I just held up my iPhone very close to the white paper, white balanced on the center of the white sun image by clicking on it with my finger and snapped this photo.

It looks even better with the naked eye!

If you look closely, you can see three sunspots!  Amazing!

Thanks for your interest!  And remember to never look at the sun!  Especially through binoculars!

Feel free to share this post on your favorite social media accounts!

Kurt

Sunday August 20th update:

This blog post appears to be going a bit viral this morning!  Thank you to everyone who has shared it!  I’m happy that so many people find it useful!

I will gladly share your eclipse photos here!  If you make your own eclipse viewing rig using binoculars, put your eclipse photos and videos online (Flickr, Facebook, YouTube, Dropbox, etc.).  Then contact me using the “Email Us” link at the bottom of this website!  Give me the link to your media and tell me what city and state you were in and I will post thumbnails and links right here in this blog post!

Photos and Videos from all over the country!

From [name goes here] in [city, state]:

[image thumbnail with link to original hosted on another site]

From [name goes here] in [city, state]:

[image thumbnail with link to original hosted on another site]

How to make your own car-top kayak rack

I designed and built what I think turned out to be a pretty decent car-top carrier rack for my kayaks.  Here is a photo of the final product mounted on the roof of my PT Cruiser.

I built the rack out of PVC pipe bought from my local home improvement store.  I designed the rack so that it can be attached to the roof of my car using standard ratcheting straps that loop around the car roof with the doors open.  The ratchets are inside the cab of the car.

Before I built this rack, my best solution for hauling my kayak to the river was just to strap the kayak itself to the roof of my car.

One problem with that scenario was that I could only haul a single kayak that way.  Another problem was that the ratcheting straps outside the cab would vibrate and buzz loudly when I was driving down the road at highway speeds.  But the rack I designed and built solved both of these problems.

Below is a photo of the rack after I glued all the PVC pieces together.  I designed the left side of the rack with a single upright that sits up into the seat hole in the first kayak which will hold it at the angle I want.  Then the other two kayaks lean up against the first one.  The right side of the rack has 2 uprights to cradle the bottom side of the third kayak.

I used T’s rather than 90’s for the 4 corners so that I could feed the ratcheting straps through the pipe and keep the straps out of the winds, thus keeping them from vibrating and buzzing.

I’m not going to give specific parts lists and specific measurements because this rack needs to be custom sized for your kayaks and also custom sized for your car.  But cutting these PVC pipes and gluing them together is very very easy.  So this is a project that just about anyone should be able to take on.

The below photo shows how 3 kayaks fit perfectly into this rack.

But I actually own 4 kayaks, and occasionally I will want to haul all 4 of them to the river.  It turns out that my SUV has a roof wide enough to hold all 4 kayaks, so I designed my kayak rack to be expandable from 3 kayaks to 4 kayaks.  So now I can use the rack on my car or on my SUV.

You can see in the below photo that the rack is now wider.  The PVC pipes on the left are all 2 inch pipes and the PVC pipes on the right are all 1 and 1/2 inch pipes.  The 1.5 inch pipes fit nicely inside the 2 inch pipes with not very much wiggle room, so that worked out nicely for this application.

If I was making a single size rack that didn’t expand, I would probably just use the 1 and 1/2 inch PVC pipe for the entire rack.  It feels to me like it is strong enough to do the job of holding up these 10 foot kayaks, but also flexible enough to bend a bit around the contour of the car’s roof.  In my case, the 2 inch PVC pipe I used for most of the rack doesn’t give very much and it ended up denting part of the roof of my car a bit when I torqued the rack down using the ratcheting straps.

Here is a photo of the rack holding 4 kayaks.

The detail photo below shows you the single upright on the rack that fits up into the seat hole of the first kayak and basically holds the first kayak upright at a slight tilt from vertical which is good for leaning the other kayaks up against the first kayak.

The photo below details the other side of the rack where the two uprights are there supporting the bottom of the third kayak.  This photo also shows my solution for holding the kayaks down.  I used black rubber bungee cords.

The photo below details the attachment points of the bungee cords.  I bought a bungee cord that was the right length to go all the way around each kayak.  And I drilled holes into my PVC pipes to attach the bungee cords.  These bungee cords hold the kayaks down tight to the rack and they also keep the kayaks from moving very much left and right.  And also, thankfully, these bungee cords don’t vibrate and buzz at highway speeds.

IMPORTANT:  This photo shows the PVC sitting down directly onto my roof.  Do not do this!  The PVC is plastic, but it’s a very hard plastic and it WILL damage your paint job!  Make sure you put something soft or rubbery between the PVC and your vehicle!  My suggestion is to buy 2 inch wide self-stick Velcro in bulk rolls and apply the soft side to the bottom surface of your PVC rack!  Also don’t ratchet it down so tight that it dents your roof!  The idea is to use PVC that is flexible and conforms to the contour of your roof!

This photo shows you the inside of one of the PVC pipes.  You can see the ratcheting strap and also the bungee cord attachments.

And here is the final rack.  I tested it at highway speeds and it worked quite well.

Another photo of the final rack.

And one last photo of the final rack.

And just for fun.  Here are a couple drawings I drew up during the process to help me decide on the design and to help me come up with a parts list to go buy.

Thanks for your interest!  Please leave questions or comments below!  Or use the “Email Us” link at the bottom of the website!

Kurt

Bats need houses too!

I got a wild hair today and I built a house for my resident bats that do such a good job of keeping the mosquito population under control.  Building a bat house is pretty easy and it only takes a few small pieces of wood.  What follows are easy step by step instructions for building a small and simple bat house.  It’s so easy you can do it yourself!

I searched the Internet for some plans and ended up drawing up my own design based on a few of the simpler designs that I found on the Internet.  Here is a photo of my plans.  (Click on any image to see the full resolution version.)

01 - bat house plans

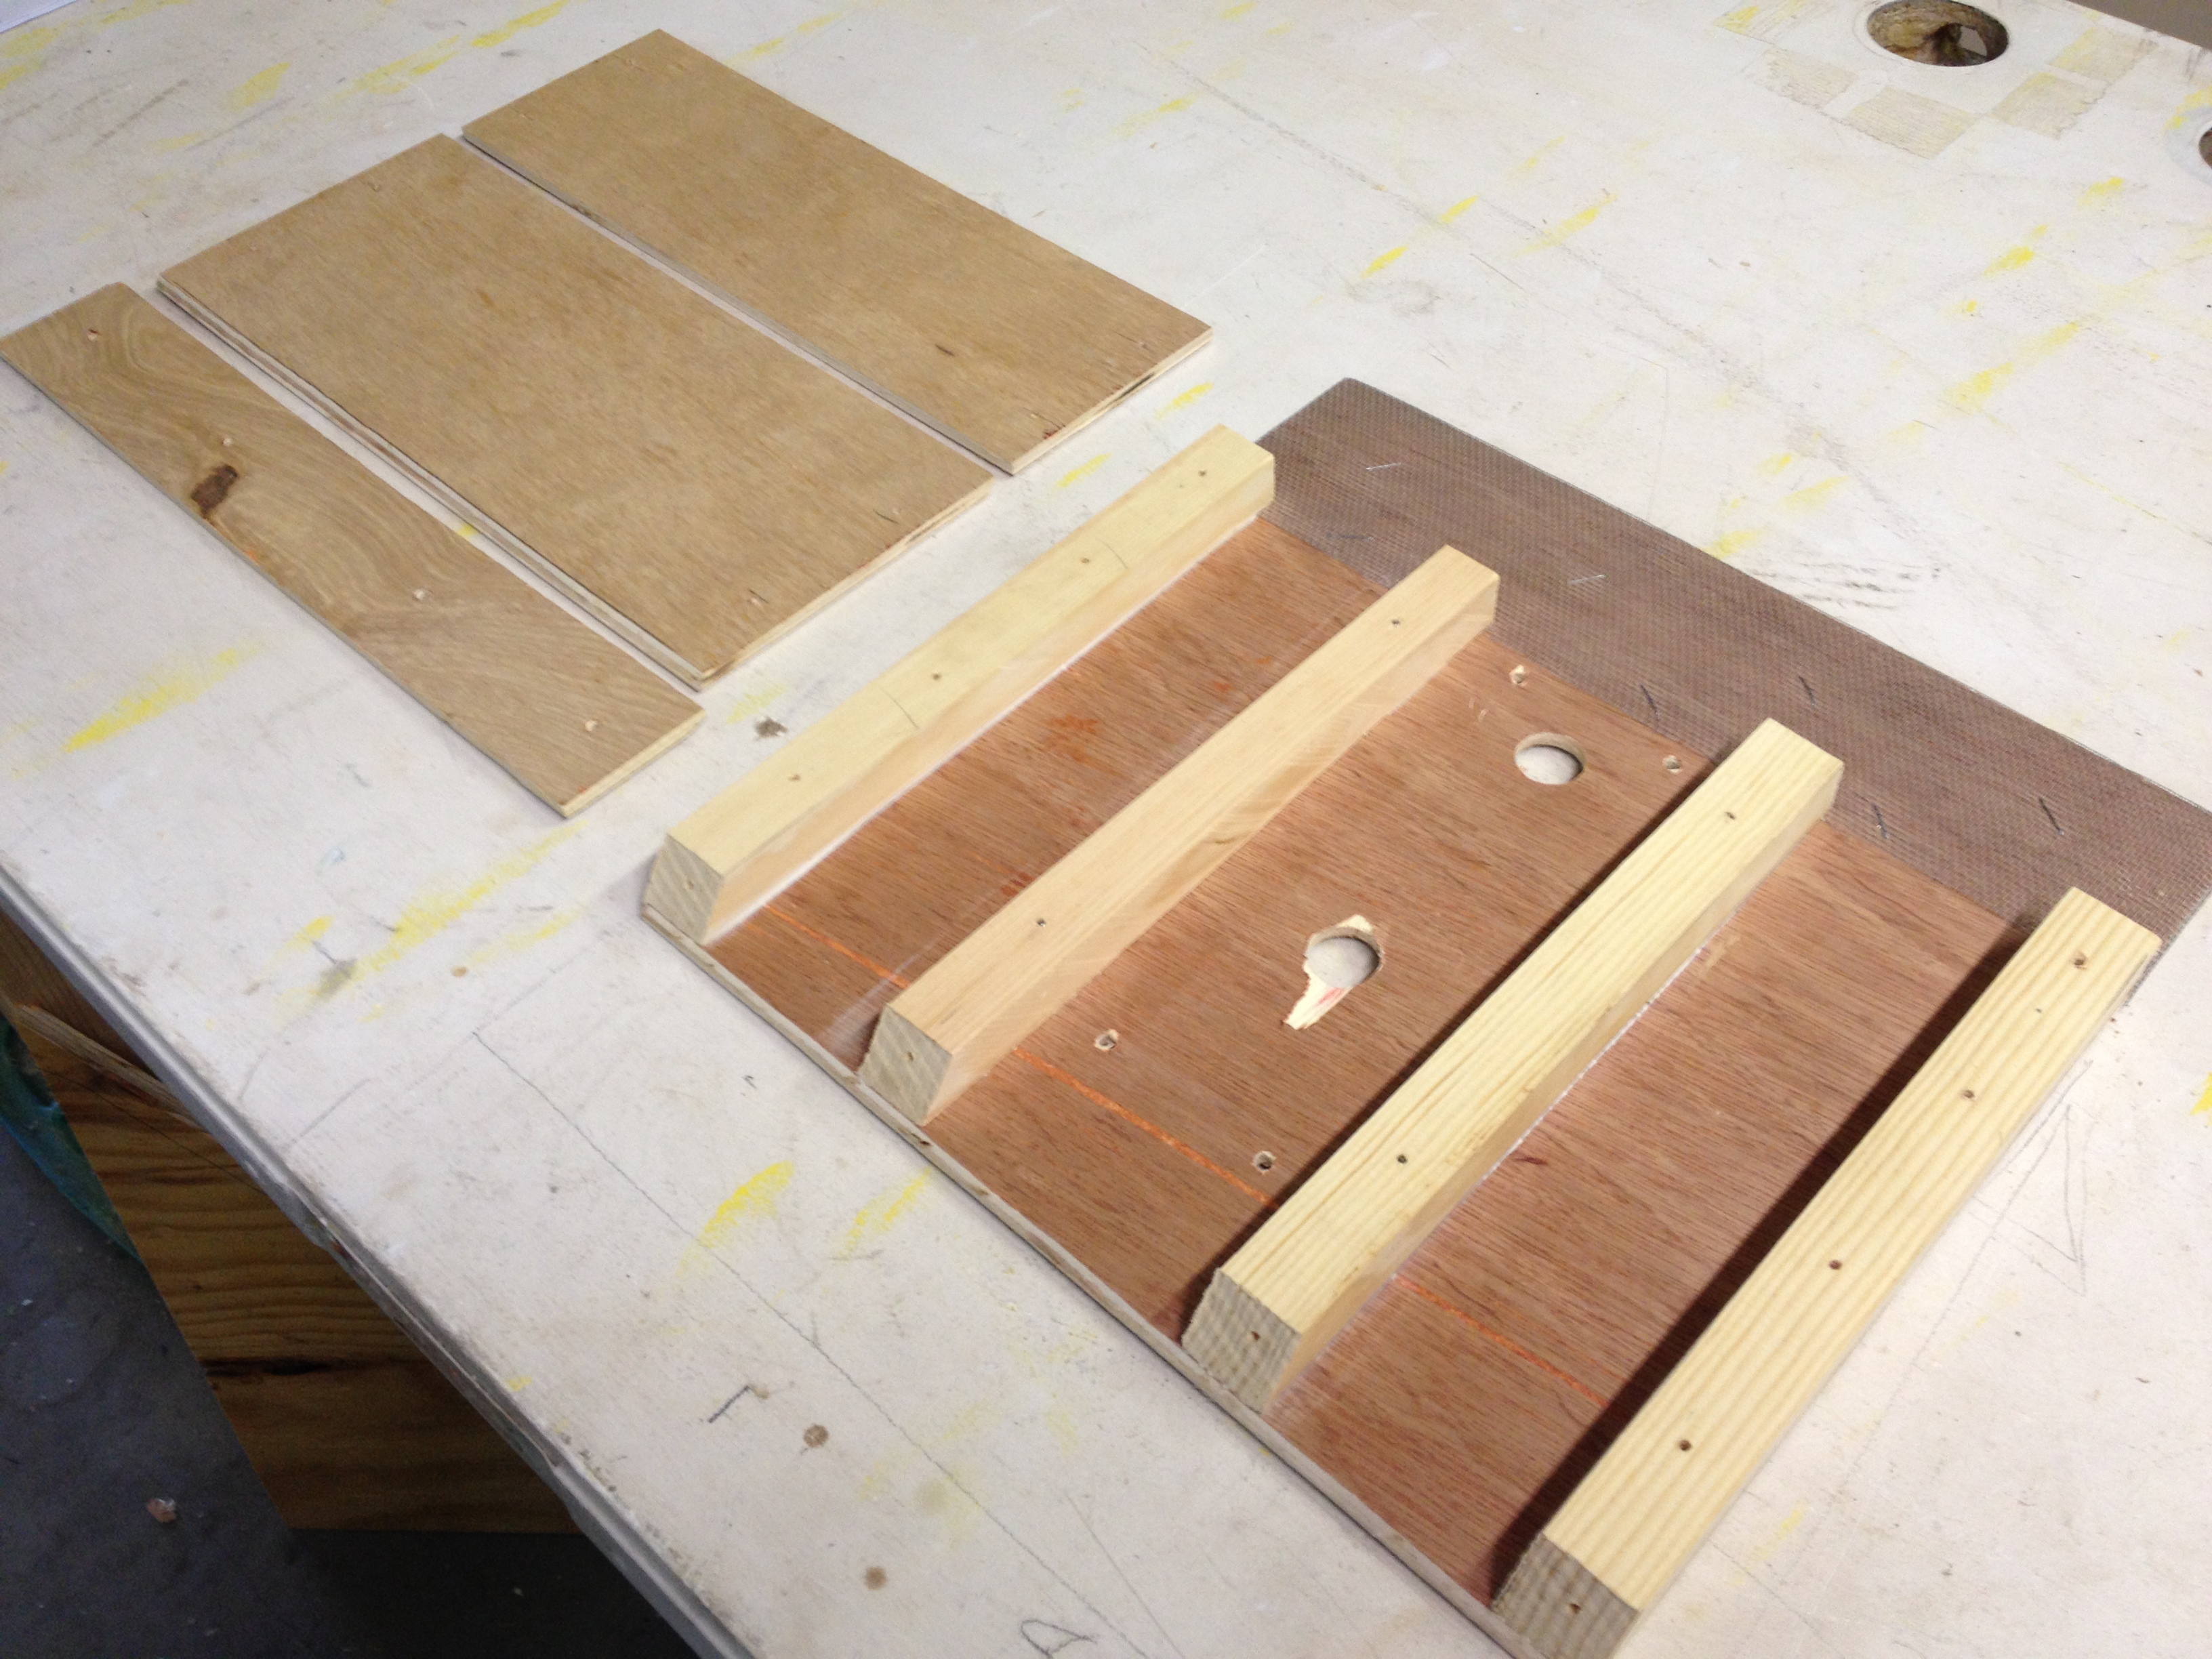
It might be hard to read, but basically it only takes a 12 inch by 12 inch piece of plywood for the back, plus a couple smaller plywood pieces for the front and one more for the roof, plus several thin slats.  Here is a photo of all the wood for my bat house project, except for the roof, which I cut last after the rest was put together.

02 - parts cut

You can see the 12 by 12 plywood piece for the back, plus a 12 by 5 plywood piece and a 12 by 4 plywood piece for the front, plus 4 wood slats that are 1/2 inch by 1 inch and around 10 inches long.  I cut the slats to their proper length during construction to fit the front of the house, so right now they are just a little long.  The plywood I used was some thin veneer that I had laying around that was leftover from another project.  But you can use plywood of any thickness for this project.  The thickness of the front and back will determine the final size of the roof piece, so that’s one reason to cut that piece last.

The picture below shows one slat is cut along it’s short 1/2 inch side at an angle for the roof.  I did not measure the angle … I just eyeballed it on my bandsaw.  Then I took the one that I had cut and I used it as a template to draw the angle on the other three slats.  That way they will all be the same angle.

03 - one slat cut

The photo below shows all four slats laid out on the 12 by 12 back piece.  You can also see a piece of screen that I had laying around that I cut to use as the landing pad for the bats.  The bats need a surface to land on that they can hold onto with their tiny claws.  A surface that is soft or rubbery or something like this screen will do fine.

04 - slats laid out

Below you can see the front pieces laid down on the slats.  Nothing is being attached together at this point.  I am only test fitting everything to make sure it’s all the right size.  The reason the front is in two pieces is that a bat house needs some ventilation in a way that does not allow rain to pour in.

05 - front pieces fit check

Above you can see how the four spacer slats stick out beneath the front pieces.  I marked them and cut them off and below you can see them now at the proper length.

06 fit check reverse angle

Now that everything is verified to be the correct size, I’m ready to attach my landing pad.  I used an office stapler to attach the screen to the plywood.  In the photo below, you can see that I started on the back side and attached the screen.  Then I rolled the screen around to the front side of the plywood and stapled it every couple of inches.  I used staples because my material is metal screen.  If you use foam matting or rubber matting or something like that, glue will probably work just fine.

07 - screen started on back side

Below you can see the landing pad completely installed from the front side where the bats will land.

08 - screen finished

Now it’s time to assemble the spacer slats onto the back plywood piece.  I’m going to assemble the slats onto the plywood back now, but I will hold off assembling the front pieces and the roof.  This is because the back needs to be installed onto my tall light pole first and then the front pieces and the roof can be installed.  Otherwise, installation of the bat house on the light pole will be much harder after the whole thing is fully assembled.  I used Liquid Nails to glue the wood pieces to each other.  I also am going to use screws for good measure.  This bat house will be outdoors and I want it to hold together for many years.

09 - slat being glued

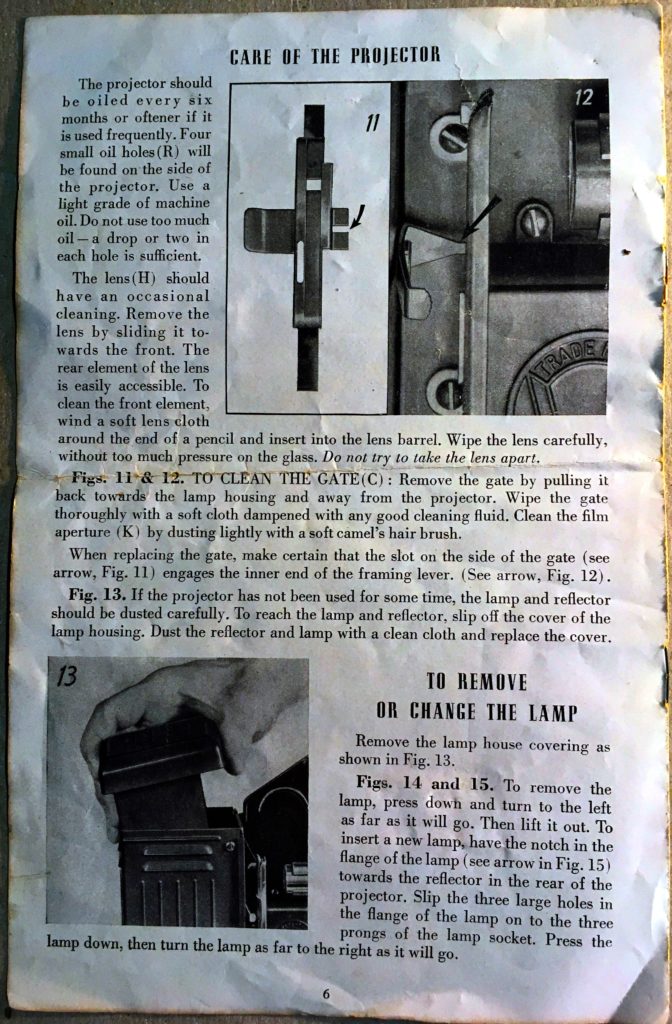
You can see below that I used wood clamps to hold the wood together tight and then I installed some screws.  Between the glue and the screws, plus a coat of primer and a couple coats of outdoor latex paint, I’m hoping this bat house lasts for many many years.

10 - slat being screwed in

Here it is on the light pole that I want it to be installed on.  There were a couple bolts sticking out of the light pole that I had to accomodate.  I’m going to put some smaller holes and then wrap picture wire around and around several times in order to hold the bat house in place on the round pole.

11 - fit check on pole

This photo shows the larger holes for the light pole bolts plus four smaller holes that I drilled for the picture wire.

12 - holes for pitcure wire hanging

Now I screwed the front pieces on, but I did not turn the screws down tight.  I put the screws in just enough to make holes that I can find again later after it is painted.

13 - start screws in front

Now I found a piece of plywood big enough to use as the roof.  I cut it out and centered it in place and then I marked it’s final location as the photo below shows.

14 - mark location of roof

Then I laid the bat house next to the roof so I could mark where the slats are located so I can put screws through the roof directly into the center of these four slats.

15 - mark location of slats on roof

Then I installed the roof, but not tight.  Just to make screw holes that I can find again after it’s painted.

16 - start screws on roof

Now I took the front and roof pieces off again so I can paint everything separately.

17 - take it apart for painting

Then I primered everything.

18 - primer

Then I painted everything.  I actually put two nice thick coats of paint because I want this to be nice and waterproof and last for many years, hopefully.  You don’t really want a bat house to be brightly colored.  It should not really stand out.  I had a dark brown paint handy so I used that.  Painting through the screen was not easy, but I did it.  Next time, I think I would probably paint the wood under the screen before installing the screen.

19 - dark paint

Then I hung the back piece as I described earlier using the picture wire to wrap around the pole several times.

20 - back is installed on pole

 Then I screwed the front pieces and the roof on. That’s all!  The bat house is complete and ready for occupants!

21 - final product - bat house

Thanks for taking the time to read these step by step bat house directions!  Let me know if you have any comments or feedback and definitely let me know if you used these directions to make your own bat house!  Leave comments below on this blog post or send me an email by clicking the email link below in the page footer.

Thanks!

Kurt