
Ever since we got our front loading washer and dryer a few years ago, we’ve been wanting to get some of those laundry pedestals to lift them up higher. But the pedestal units are pretty pricey. Those things are like $250 bucks … each. Ridiculous. So I decided I would make my own laundry pedestals out of wood that I had laying around in my shop. And I decided that I would design a pedestal that would include both a step stool and a storage drawer in one single unit. The step stool will help us reach the wall mounted cabinets that are mounted above our washer and dryer.
Click on any photo to view larger versions of it in my photo gallery.
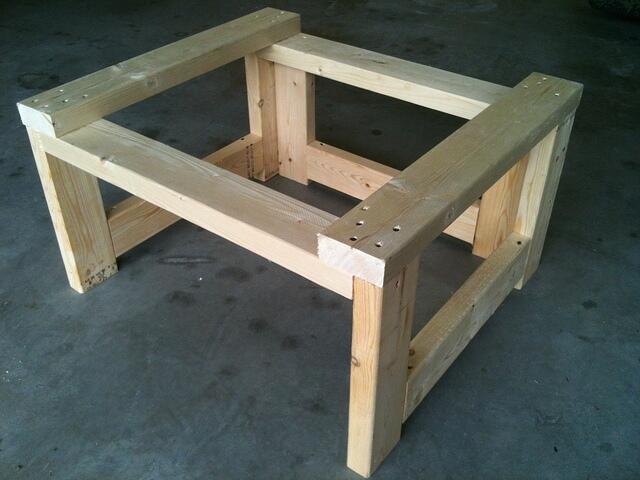
Here is a photo of the basic frame for my pedestal design. You can see that the front (facing down and to the left) is basically open to receive a drawer. The sides and back are solid enough to support a few hundred pounds (as long as the weight is directed down into the floor and focused at the four corners). All the cross beams are just there for stability. The four feet of the washer or dryer sit on the top-most two 2x4s.
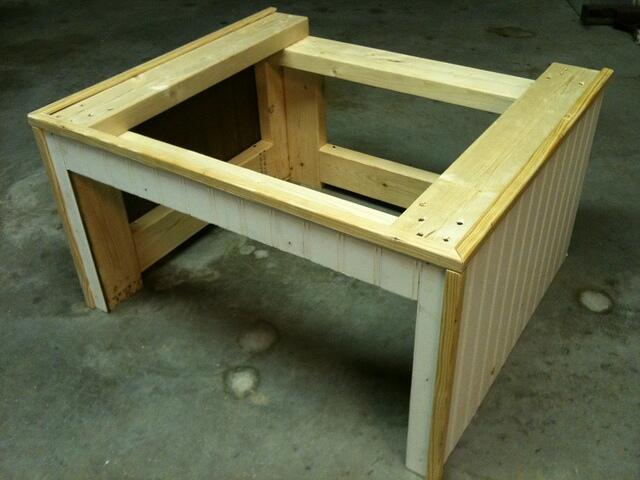
Here is the same basic frame after the decorative plywood and trim was applied. The back of the unit was left open and so was the top. That should allow for access to the bottom of the washer or dryer and access behind the unit if that access is ever needed.
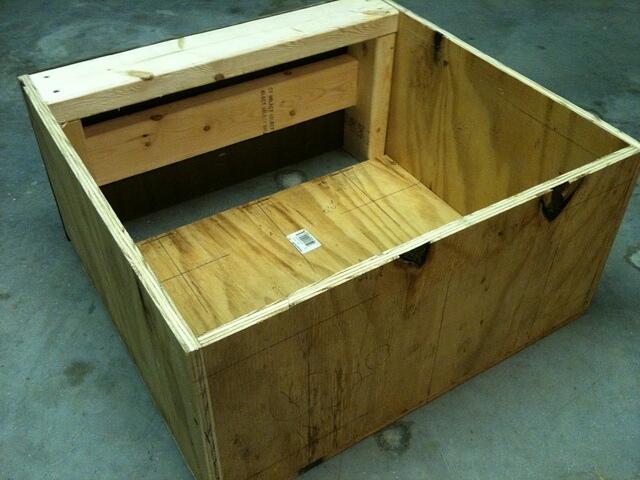
I forgot to take photos of the drawer unit during construction, but this photo gives you a pretty good idea of it’s design. It’s fairly straightforward. The front of the drawer is on the upper left in this photo and contains the step stool portion which is made from 2x4s for strength. The horizontal 2×4 in the middle is both for stability and for mounting the pull handle. The rest of the drawer is made from plywood that I joined together with biscuit joints. The 4th sidewall is missing from this photo, but it fits right over the exposed 2x4s shown in this photo and creates a completely closed drawer bin used for storage.
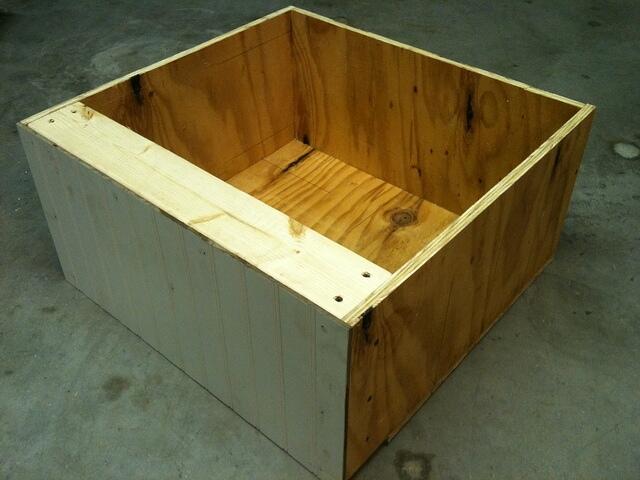
Here is the same drawer from another angle. The front of the drawer has the decorative plywood.
And here is what the unit looks like with the drawer installed. I chose not to install a drawer slide. I just installed some felt pads underneath the drawer unit and it slides in and out just fine. The next step is to prime and paint to match the washer and dryer.

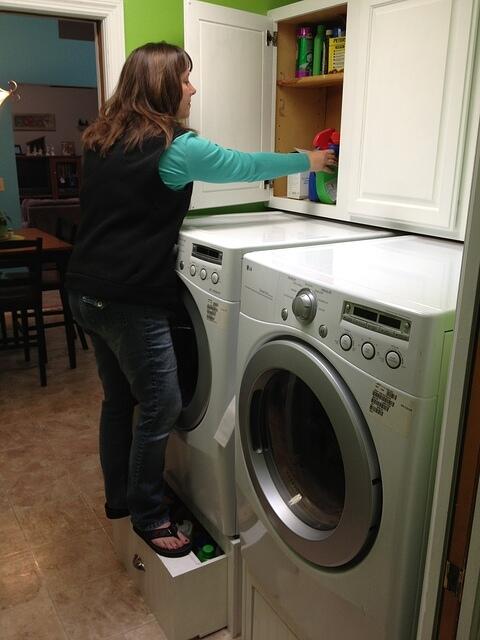
And here is what the finished laundry pedestal looks like in use in our laundry room. The drawer holds quite a bit of stuff and pulls out much farther than is shown in the photo below.

And the step-stool feature allows us to reach the wall mounted cabinets above our washer and dryer.
That’s about all the detail that I can think of. Add a comment below if you like this design or if you have any questions about details that I have left out. If you end up using my design for a laundry pedestal or if you have an ideas for improvements, please feel free to post in the comments below.
Kurt
Kurt you have became a very good carpenter. When you retire you will have a great time playing in the work shop..
I love it would like a copy of the plans please if possible please but i love it
Kurt,
Great idea! I’m in the process of copying as best I can your project. This is a great way to dispose of a lot of short pieces of 2×4’s. Thanks for the idea. And if you have any suggestions for lifting that heavy front loading washer up there I’m receptive!
Thanks again
Bill
can you explain how you placed the washer or dryer on top of these platforms? Other than brute strength and lots of cursing?
Yes, getting the washer up onto the platform was far from easy. If memory serves, I tilted the washer back on the back two feet till the front two feet were high enough to push the platform under them. Then I carefully lifted the back up using brute force and rested it on my knee. Then I slowly and carefully walked it on its two front feet inch by inch towards the other end of the platform. Dangerous for sure.
At this time I don’t have any better ideas. Maybe using five people. One on each corner and one to slide the platform under? If anyone reading this has some suggestions, please add a comment. Thanks.
Do you have measurements at all of the 2X4’s?
Well, the 2x4s are basically just the size you want the platform to be. The width and depth of most washer and dryers may be standard, but I don’t want to take the chance of telling you a number and having it not fit your specific appliances. Also, the height needs to be the height that you want in order to fill the space you are working with. So I’d prefer to not give specific measurements if that’s okay.
Hi Kurt!
I love it! and you are correct the pedestals sold at stores are ridiculously priced! my husband and are retired and were shocked at the cost of the in store purchased pedestals. We bought a front loading washer and dryer too and are very impressed with this wood working project. Thanks a lot. I definitely want of these and I can see why you need one! You could almost fall into the washer/dryer just getting your clothes out and I am sure your wife loves this project you completed!this will be one of our summer projects to do in Wisconsin.
Thank you for commenting! It’s great to hear that folks are getting benefits from my blog posts!
i used my 3 ton auto jack; haha; put think plywood between jack and machine so not damage underside ; cranked it up about even (15″); it slides and is very heavy and cumbersome; then slid it inch by inch; bruised ribs pulled muscle but i got it ul there?
I really like the design of these pedestals. My wife and I were planning to buy some for our washer and dryer, but I will save money and try this instead. The only issue I can foresee in my situation, is that our units are in the basement. Our floor is not level by any means. Your design, coupled with the leveling glides on the units should remedy any leveling issues though. I can possibly attach some leveling glides to the bottom of the pedestals too. I will also need to attach a bottom to the pedestals for each drawer to sit on, so they are not directly on the basement floor.
Been looking and looking for a design but I love the simplicity and functionality of yours. Wish I would have found it sooner. Do you know about how much the bases cost and weighed at the time? Do they still fully support even the washer? I would need to put glides on the drawer but might need another top support.
Thanks! I don’t have any idea of my cost. Most of the materials I just had laying around. No idea about weight either. Sorry. They fully support the washer. The 4 corners are 2x4s straight up and down, which can hold up a lot of weight. The washer’s foot pads are on those 4 corners. At least mine are.
To lift the washer, you could slowly tilt and “shim” with 2×4 pieces until it reaches the height of the pedestal. Then you’d only need to slide it (awkwardly) onto the pedestal, rather than deadlift the monster.
Good point!
If you still live in FL, can we ask you to make the same for us? Would love these ones for our washer n dryer.
I’m afraid that I can’t make them for you, but these instructions and these photos should be enough information for anyone who is familiar with woodworking to follow. Good luck! And let me know how they turn out!
It’s Great Design? I wonder if you sell this laundry pedestal? Many thanks
Thanks! But I’m not selling them. Sorry about that. But these instructions and these photos should be enough information for anyone who is even remotely familiar with woodworking to follow and make their own.
Very nice. I built one laundry pedestal already to hold both units. Sometimes the washer spinning will cause the dryer to rattle, so for the next build I think I’d like separate units with some vibration dampening foam & rubber. My wife would like drawers, and your idea of the integrated step is perfect for our application – we have cabinets above our washer and dryer too.
Guess I know what I’m doing next weekend….
Yes, vibration is definitely a problem. I like the foam rubber idea. I might put some between my washer and pedestal and see if that helps. Occasionally we go into the laundry room and the whole washer and pedestal assembly has “walked” away from the back wall and into the middle of the hallway.
Are there rollers under the drawer/step? How does it glide out?
I did not install rollers, but you could easily do that if you allowed for that extra height. Mine just slides on my slick linoleum floor.
Did you use 3/4″ plywood for the drawer? Sure looks like it. Would, say, 5/8″ work for the purpose?
How did you attach the trim pieces? I’m considering finishing nails and glue. Thanks very much for the pictures and instructions! This is exactly what I’m looking for. As for the height, if it’s a gas dryer and it will be in a garage, then it’s a good idea to make the overall height of the pedestal 16.5″. This will meet code in most regions and help prevent the pilot light from ignighting any flammable fumes.
Forgive me for that last post. The height should be over 18″ for gas dryers installed in a garage, not 16″.
How did you attach the corner trim pieces? I’m at that point right now, and am thinking that my pneumatic stapler should do the job. Or did you just use wood glue? TIA
Sorry I am just now seeing this. I used both glue and some small nails from my pneumatic nail gun.