Laundry folding countertop hinges open to reveal utility sink

Little by little we are making small home improvements to our new house.  Recently my lovely and talented wife came up with this amazing idea.  It’s a countertop for our laundry room that is primarily used to fold clothes fresh out of the dryer.  The most awesome and amazing part of her idea is that the countertop portion over the utility sink is hinged and folds up out of the way so we can use the sink.  I liked the idea so much that I immediately started designing and creating it.

Here is a photo of the final product.  The decorating ideas also came from my lovely and talented wife, by the way.  Click on any photo to view larger versions of it in my photo gallery.
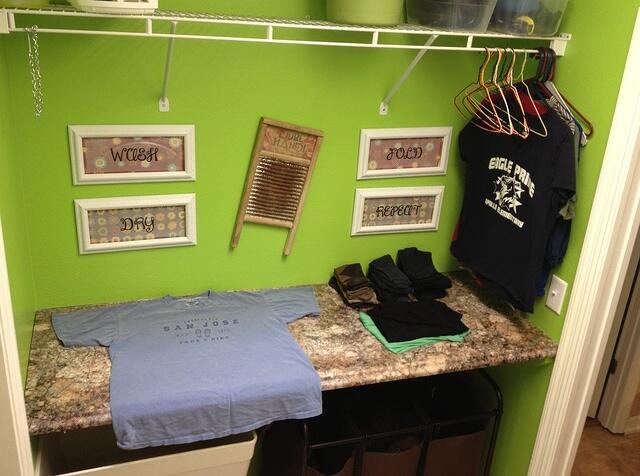
I bought the countertop from my local home improvement store and cut it down to the correct size using my table saw.  This countertop looks like granite, but it is actually a pressboard or an MDF with a hard laminate on top.  Here is the final product from another angle.
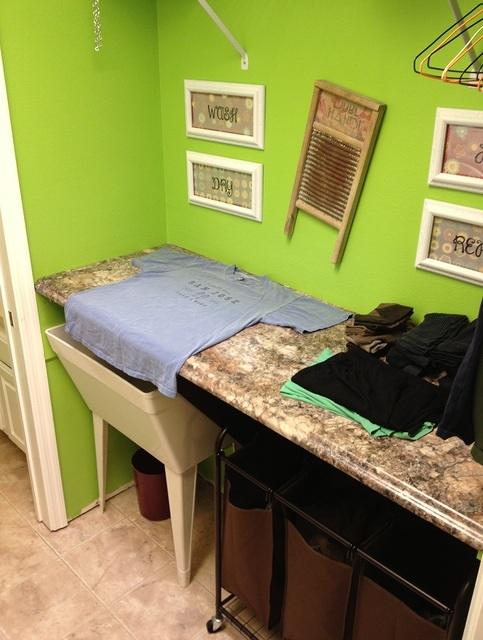
And here is what it looks like with the sink countertop opened up.  I installed a chain and hook to hold the countertop up.
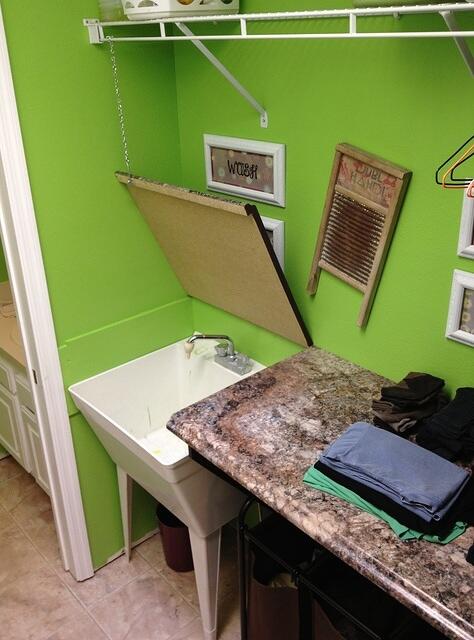
And below is some design detail of the hinged countertop.  It’s pretty hard to see since the green paint pretty much blends together and hides detail, but the hinge is actually mounted to a piece of plywood that was mounted directly to the studs in the back wall.  I cut out the drywall on the back wall and replaced the drywall with plywood that was about one eighth inch thinner than the drywall.  That way the hinge would be set into the wall a bit in order to hide the hinge when looking from above with the countertop down.

Aside from being held up in the back by the hinge, the hinged countertop is held up on the left by another piece of plywood that is mounted on top of the drywall and provides a ledge for the countertop to rest on when closed.  And on the right side, I created a bracket out of plywood and 2x4s that sticks out enough for the hinged countertop to rest on when closed.

Here is a better look at the plywood along the left side of the hinged countertop that it rests on when closed.  It’s just plywood mounted on top of the drywall.
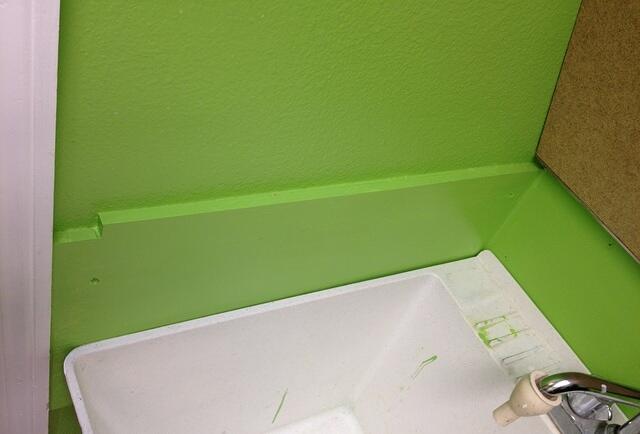
And here is a better look at the bracket that I created to hold up the countertop next to the sink.  I notched the 2x4s so that the plywood would slide into them and hold firmly.  I glued and screwed the plywood into the notches from the back side and then mounted the whole thing to the wall.
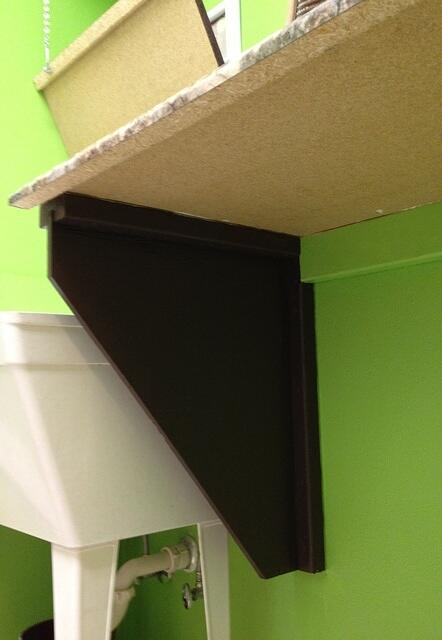
And here is a reverse angle showing a close up of the bracket plus you can see how I used 2x4s under the other portions of the countertop to hold it up.  When installing something like this which is fairly heavy, it’s important to screw into wall studs.  Otherwise, the weight could pull the whole thing right off the wall.
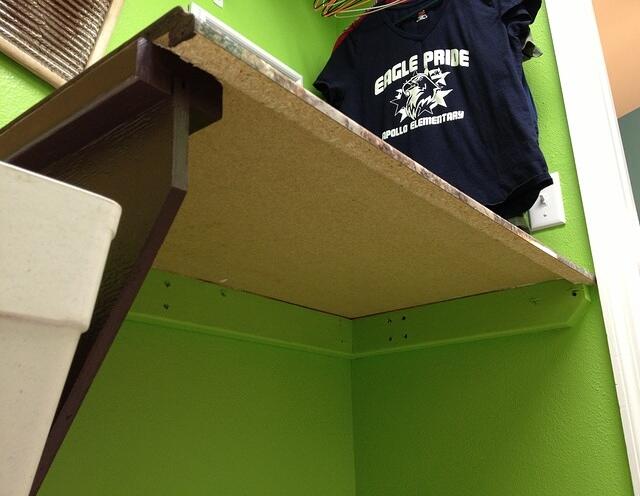
That’s about all the detail that I can think of.  Add a comment below if you like this design or if you have any questions about details that I have left out.

Kurt

Poll: Mac Vs. PC (2012 version)

Three years ago, I took this same exact poll. I’m curious how different the results will be three years later.

Please take 5 seconds out of your busy day and answer this simple question (by the way, this poll is completely anonymous):


Here is a direct link to the poll website in case the above inline script doesn’t work for you:
http://polldaddy.com/poll/6768071/

Thank you for your time!

Kurt

macpc
image courtesy http://www.contrib.andrew.cmu.edu/~jshersh/MacPC.jpg

My Apple IIe: Nearly 30 Years Later

We bought a new house last year and as I was moving my old Apple IIe computer from my old attic over to my new attic, I thought it would be fun to hook it up and see if it still worked.  To make a long story short … it worked!  (Scroll down to see some pictures and even a video clip of my working Apple IIe.)

To make a long story even longer … here are all the gory and geeky details:

Back in 1983, when I was only 13 years old and in 8th grade in Central Illinois, my parents bought me an Apple IIe computer for Christmas.   At that time I had no computer training but I think there were a couple of APPLE II computers in my school.

Well, now that I look at the photo of my sister and I unwrapping it, I guess it was technically a gift for the both of us.  But I think we both knew it was really mine!  🙂

Here’s an old and humorous Apple II commercial:

Purchase Details:

The cost of my Apple IIe computer in November of 1983 was $995 plus $115 for the standard green phosphor monitor for a grand total of $1,165 including 5% sales tax.  That translates to nearly $2,700 in 2012 dollars.  Yes, that’s a lot of money for a 13 year old kid’s Christmas present.  The Apple IIe had only been on the market for less than a year when I got mine so it was not extremely popular yet. To hook it up to your own television, you would pay $70 for a modulator rather than $115 for the green monitor, but the resolution would not be as sharp on a television screen as it was on the computer monitor.  We eventually did get the TV modulator, though, so I could use the computer in full color.  Full color for an Apple IIe was only 15 colors, by the way.

My parents bought the computer from Wallace Micro-Mart on University Street in Peoria, Illinois.  I believe the salesman there, who was listed as “Howell” on the hand written carbon receipt, lived in our same home town.  At the bottom of the receipt it says that “Wallace has been serving the Peoria Community for over 10 years”.

I google’d Wallace Micro-Mart and all I found was this old commercial for an Apple Lisa computer:

Geeky Specs:

The Apple IIe came with 64KB of memory standard, but it was expandable to 1 Megabyte and also had lots of expansion slots for various accessories.  It ran at a screaming 1 Megahertz and had an 8 bit data bus.  It had 2 text display modes and 4 graphics display modes.  The text modes were 40 or 80 columns at 24 lines.  The graphics modes were 40×48 or 80×48 block low resolution modes and 280×192 or 560×192 pixel high resolution modes.  For comparison, the Apple IIe high res graphics modes were about the same pixel resolution as your most common cell phones used in the year 2005 … and those old cell phones definitely had way more memory than the Apple IIe.    The Apple IIe contained Applesoft BASIC in ROM and booted into it if no floppy disk was found during boot.

Unboxed Nearly 30 Years Later:

Here is a photo of the computer in 2011 when I unboxed it during the move.  It is basically a big case containing a keyboard, power supply, motherboard and that’s about it.  It did not come with a mouse, nor did any of the Apple software support a mouse for the Apple II series of computers.  I believe the Apple IIe came with one floppy drive and I think we bought the second one later.

The keys on the keyboard had some serious friction resistance and the keys were not very easy to push down.  I think the key wiggle tolerances were pretty tight and the plastic-to-plastic friction caused quite a bit of resistance if you didn’t push the keys in the exact proper direction.  Typing on this keyboard was seriously loud.  Click, click, click!

There were some unique keys on these old Apple keyboards.  Notice the outlined apple key which was called the open-apple and the solid white apple key which was called the closed-apple or solid-apple.  The key sequence of simultaneous Control-OpenApple-Reset would reboot the machine immediately.  Control-ClosedApple-Reset would enter BIOS setup before rebooting.  Control-ClosedApple-OpenApple-Reset would perform a self test during reboot.  Those are some crazy key sequences.

(Click on any photo to see it in full resolution.)

Here is the green phosphor “Monitor II”, as Apple called it.  It had one single RCA style input connector and that’s it.  No audio jacks, no output jacks, nothing.  This thing was pretty old school and very basic.  The serial number on this monitor is actually written by hand.  The one cool feature was that the actual glass CRT was mounted on an axis that tilted up and down for a more direct viewing angle.  The user just pushed on the darker green plastic frame around the glass CRT to tilt the glass up and down.

Here is what the motherboard looks like inside the case.  The lid was basically held down with a couple of hard plastic velcro type devices.  There are 8 expansion slots and I was using four of them when I packed mine up for storage back in the late 80s.

The tiny card on the far left is the 80 column card and it is plugged into the auxiliary slot.  This card just let the computer display 80 columns rather than the default 40 columns.  This card also added more memory to the computer.

The long card on the left in slot 1 is the parallel interface card.  It sure took a lot of electronics to interface to a parallel printer back then!

The short card in the middle in slot 4 is a Covox sound card.  This card intercepted the sound going from the motherboard (yellow and red wires ) to the built-in speaker (black wires).  The built-in speaker is mounted under the keyboard pointing straight down.  This Covox sound card also had a headphone jack mounted directly on the card itself.  I thought that was terribly inconvenient, so I de-soldered it from the card and mounted it into the plastic hole cover on the back of the computer.  The brown wires are connecting the card to the headphone jack.  I was pretty handy with a soldering iron, even when I was young.  🙂

The medium length card on the right in slot 6 is the floppy disk drive controller.  Both disk drives are connected to that card using standard flat ribbon cables and nothing else.  PC users are used to connecting power cables separately from data cables, but the power and data are both in these ribbon cables.  Convenient … and also just a little scary.

This is a 5 and a quarter inch magnetic floppy disk that holds the operating system.  Do you remember these floppy disks?  Some floppy disks were double sided, so you could flip them over and use the other side and get twice the data onto them.  You had to punch out a notch in a specific place on the disk in order to make it read-only.  Then you had to put a sticker over that hole in order to write to it again.  Computer stores sold special notch cutters, but most of us users just used a standard hole punch numerous times until we got the notch created in the right place in order to open up the microswitch in the disk drive.

30 years ago, I loved that Apple gave stickers away with their hardware and they still do it today and I still love it!  This was a folder containing the receipt and some manuals and it also contained some really cool full color apple logo decals.  I never used the decals.  I just checked EBay and people are selling these vintage rainbow Apple stickers for 20 bucks each!  Wow.  I guess they are a true collectors item now that they are 30 years old.

The owners manual was spiral bound.  It took you though the internals for a computer and then walked you through the DOS command line commands and also introduced you to Applesoft BASIC programming.

Ah, the good old dot matrix printer.  Man, these things were loud.  And how annoying was it to keep these things feeding the paper properly?  These things were part typewriter and part printer.  When somebody invented laserjets, we never looked back, did we?

I actually still had an un-opened ribbon for the dot matrix printer.  It probably dried out a year after I packed this thing up and went to college, though.  I don’t remember how much these ribbons cost, but I do remember trying to squeeze every last drop of ink out of them.  We used to reuse them multiple times and some people went as far as trying to re-ink them.  I guess we still do the same thing today with our inkjet cartridges and our toner cartridges, though.  The more things change, the more they stay the same!

Here is a photo of the command line after one of my personal boot disks had been booted up.  This was just a disk that had some small Applesoft BASIC programs on it.  This particular program printed some text to the screen and exited.  Very much beginner stuff.

If you typed CATALOG from the command line, the computer would show you the list of files on the floppy disk.  File type (A=Applesoft BASIC, B=Binary, I=Integer Basic, T=Text) and file size (disk sectors) and file name were shown.  Notice that file names can have spaces.  UNIX did not allow this initially and neither did the early DOS for PCs, but Apple did.  Now pretty much every OS does allow it.

This image shows a listing of a small Applesoft BASIC program.  It was written on the command line, line for line, then it was tested and if it worked, it was written to the disk as a file.  In Applesoft BASIC you did not start with an empty file on disk and write characters to that file.  You created your program directly in the computer’s memory and copied it to disk later.  There was no plain text editor app that I’m aware of.  No computer manufacturer does that anymore, for good reasons.

In this particular program, it draws some boxes on the screen with the HPLOT commands.  Then it creates an artificial delay using the old school empty for/next loop.  Then it repeats the box drawing sequence three times with a for/next loop, part of which has scrolled off the screen.  After three cycles of the box drawing sequence, it runs a subroutine, which is not necessary in this case since it is only called once.  But that subroutine prints some stuff on the screen and returns.  Then the program performs another artificial delay and then it runs a whole different program from the command line.

I learned all my Applesoft BASIC programming from these two books.  They are excellent.

Here is a short video showing me typing in and executing a very simple Apple Basic program.  The program just does some simple multiplication in a loop for 2000 iterations.  Do you want to guess how long it will take to execute?

Here is a short video showing the listing and the running of two programs that I had written.  The first program was copied from one of my programming books and then I tweaked it.  The program landed a lunar lander on the moon, and then I added animation to open up the door and have a little astronaut jump out.

The second program is the Garfield program that was listed earlier.  This Garfield program was completely original and was my own creation.  I drew the Garfield character out by hand and traced it onto graph paper.  Then I marked out the pixel numbers and started programming lines to draw out the shape on the computer.  It was actually a lot of work.

Here is my actual Garfield hand drawn sketch that I used to create the Garfield program.  You can see how much work it was.  I just realized that the right hand never got programmed. Oops.

Here is a snapshot of Apple Writer II which was the word processor if it’s day.  It’s a completely text based program.  There was no mouse attached to these computers if you can imagine that.  You just typed your words into the program and saved it as a file.  Then you could move the cursor around your document with the arrow keys and turn on bold or italics or whatever.  Then move your cursor elsewhere and turn that formatting off.  Pretty old school.  You would have to print it out to see what it actually looked like.  There was a lot of trial and error back then.  There was no print preview feature.  Your print preview was a draft mode print to paper.  When you were happy with the draft mode printout, you printed it one more time using high quality mode, which basically ran over each line multiple times for darkness.

This was one of my favorite games on the Apple IIe.  Hard Hat Mack.  (http://en.wikipedia.org/wiki/Hard_Hat_Mack)

Hard Hat Mack was similar to Donkey Kong, I guess.  The idea was to patch the holes in all the steel beams at every level while avoiding all the bad guys.  You could not jump over the bad guys.  You could change levels of beam by using the elevator or by jumping off the right side and landing on the spring on the ground and get propelled up to another level.

Here is another game that was fairly popular on the Apple II family of computers in the early 80s.  BC’s Quest for Tires (http://en.wikipedia.org/wiki/B.C.%27s_Quest_for_Tires). It was a basic scroller and you had to jump and duck obstacles.  It scrolled faster as you beat levels.

Rescue Raiders was another cool game.  (http://en.wikipedia.org/wiki/Rescue_Raiders)

Here is the splash screen for Rescue Raiders.  That’s about as advanced as the graphics got on the Apple IIe.

Now Choplifter was definitely my most favorite game on the Apple IIe.  I  played this game constantly.  (http://en.wikipedia.org/wiki/Choplifter)

In Choplifter you got to fly a military helicopter around on a scrolling arena that had tanks driving around shooting at you if you got too low.  But the object was to land and let the soldiers climb into your chopper.  Then you had to fly them back to base and let them out and go back and pick up more.  There were enemy jets that occasionally flew in and shot at you.  Those jets were pretty good at hitting you.  And if the jets didn’t shoot you down, the occasional UFO would fly in and shoot you.  Not sure how the UFO fit in with the whole prisoner of war theme that the game had going, but what 13 year old kid cares about stuff like that?

I had some other games that were more adventure style role playing games.  The Missing Ring was one. (http://en.wikipedia.org/wiki/The_Missing_Ring)

Odyssey: The Compleat Apventure was another.  (http://en.wikipedia.org/wiki/Odyssey:_The_Compleat_Apventure)  This one came from Great Britain, I believe.  Actually, I think quite a few of my Apple games came from my friend Mick, who had spent the previous few years living in England.  He brought an Apple II and lots of pirated games back with him.

Speaking of pirated games, not all of them came from England.  This is the splash screen from one of my floppy disks.  I believe the Illinois Pirates Association, among other groups, created and distributed programs that could crack copy protection and could copy games from the original floppy disk onto another for sharing.  I don’t condone this practice, obviously, especially since I am now a professional software developer.  I can’t remember now where I got this hacker software.  Pretty much everyone had this sort of hacker-ware, though.

This is a photo of Turtle Tracks software which was a great way to introduce young kids to computer programming.  The turtle was the drawing pen and you sent commands to the turtle, like move ahead 10 or turn right 45 degrees.  This Turtle Tracks software really got me interested in programming.  Turtle Tracks was based on both the Logo programming language and BASIC.

This was one piece of hardware add-on that I was really excited about when I was a kid.  The 8 bit sounds that the Apple IIe could produce were fairly lame … even to a 13 year old.  This Voice Master device from Covox Inc. plugged into the joystick port on the computer and it was a speech and music processor.  You could hook it up to an external speaker for some awesome sound quality or use a headset too.  And it had a microphone input where you could literally talk voice commands to your computer.  The speech and music processor hardware only worked with select software, though.  I remember trying to marry it to a simple game that I had typed in from a magazine.  The game was just a simple maze that you had to move a character through using the arrow keys.  I worked hard trying to get the game to work using only voice commands, like up, down, right, left.  It had marginal success, but it was far from perfect.

Here is a photo of a Beagle Bros software catalog.  (http://en.wikipedia.org/wiki/Beagle_Bros)  Beagle Bros were famous for creating fun and creative software for the Apple II family of computers.  Somehow I got on their mailing list and I’m glad I did.  These catalogs were fun, even if I wasn’t into purchasing any of their software.

This image is the index and one example of a piece of software that Beagle Bros sold.

This image shows how fun the Beagle Bros catalog was.  They hid tiny little programs throughout the catalog.  It was always fun to type in these little programs to find out what they did.  Usually they made funny little sounds or did silly little things with graphics.

A couple hours after I put my old computer together and started playing with it, it made a pop and hiss and smoke started rolling out of the case.  Not good.  I yanked the power cord out of the wall as fast as I could.  It was the power supply.  I opened up the supply and carefully took out the circuit board and there was a single line noise capacitor that had burst.  I guess that is the weakest link in these power supplies.  It’s probably amazing that it lasted as long as it did.  This capacitor appeared to be full of aluminum foil and paper.

I found a reasonable size capacitor on Ebay and bought it for a few bucks.  It did not fit the circuit board footprint perfectly, but I bent the leads a bit and made it work.  I put the power supply back together and it’s been working fine ever since.

Some of the other games that I liked to play on my Apple IIe were:

*  One on One: Dr J vs. Larry Bird (http://en.wikipedia.org/wiki/One_on_One:_Dr._J_vs._Larry_Bird)
*  Castle Wolfenstein (http://en.wikipedia.org/wiki/Castle_Wolfenstein)
*  Chivalry (http://en.wikipedia.org/wiki/Chivalry_%28game%29)
*  Karateka (http://en.wikipedia.org/wiki/Karateka_%28video_game%29)
*  Wizardry (http://en.wikipedia.org/wiki/Wizardry:_Proving_Grounds_of_the_Mad_Overlord)
*  Olympic Decathlon (http://en.wikipedia.org/wiki/Olympic_Decathlon)
*  Flight Simulator II (http://www.gamefaqs.com/appleii/915435-flight-simulator-ii)
*  Lode Runner (http://en.wikipedia.org/wiki/Lode_Runner)

Some of the programs that I used which were not games were:

*  Apple Writer (http://en.wikipedia.org/wiki/Apple_Writer)
*  Bank Street Writer (http://en.wikipedia.org/wiki/Bank_Street_Writer)
*  Print Shop
*  Microsoft Typing Tutor II
*  VisaCalc (spreadsheet) (http://en.wikipedia.org/wiki/VisiCalc)
*  Fontrix (which allowed you to create your own fonts)

Conclusion:

If you are still reading this, then you are either my mother or you are a true computer geek.  Congratulations either way.  🙂

This computer was a good learning tool for me as a young man.  It wasn’t cheap, but I think my parents got their money’s worth out of it.  And it actually still works.  After seeing that it still worked fine, rather than putting it in storage in my new house, I have it set up and working in my new man-cave.  Every once in a while, I take a trip down memory lane by playing Choplifter on the green phosphor screen.  Almost makes me feel like a 13 year old kid again!   🙂

Kurt

Please Invent This: Zero-G Sleeping Device

I’m a pretty busy guy, so I don’t really have the time nor the energy to implement every single great idea for a new invention that I think of.  So I’m going to just release any idea trademarks that I might have enjoyed and put my invention ideas out to the general public for implementation.  If you do actually end up getting filthy rich off of any of my invention ideas, I won’t sue you but please feel free to send me a little of your filthy money just to make certain that you are able to sleep soundly at night.  🙂

[image from http://en.wikipedia.org/wiki/File:Stacks_of_money.jpg]

Ever since I saw a video back in the early 90’s showing Shuttle astronauts sleeping in zero-G, I’ve been slightly obsessed with the idea of creating a way to sleep in your natural weightless body posture here on the ground.  It’s nothing I’ve ever actually done anything about, but had in the back of my mind that I was going to invent some sort of magical zero-G sleeping device and become rich and famous someday.

[image from http://flightwork.blogspot.com/2008/01/when-astronauts-sleep.html]

Weightless Posture

Astronauts (and space tourists) who sleep in zero-G take on a natural body posture like the posture shown in the below sketch.  Their muscles all relax and their arms float up in front of their face.  They crouch over ever so slightly and their head tilts down just a bit.  Their legs are bent at the waist and also at the knees.  It’s almost like a recliner position, but with your hands out in front of you.

[image from http://msis.jsc.nasa.gov/sections/section03.htm#Figure%203.3.4.3-1]

Previous Attempts

There appears to be no simple way to reproduce this natural zero-G posture down on the ground.  There is a popular massage chair called the “ZeroG Immersion Massage Chair” that is basically a big poofy recliner on steroids.  I could probably take a nap in this chair for a couple of hours but I doubt I could sleep soundly for a whole night in it.

[image from http://shop.humantouch.com/zerog-2.html]

There are lots of mattress companies that claim to put your body in the most natural position.  Most of the mattress designs I’ve seen advertised try to give you the most properly aligned spine:

[image from http://www.weknowmattresses.com/2012/02/proper-spinal-alignment/]

But can a single mattress really be comfortable for all the different sleeping positions like side, back, stomach?  Many people who sleep on their backs will snore on their backs.  Many people who sleep on their stomach will have back problems due to the unnatural arching of the back in that position.  Many people who sleep on their side will have to flip sides every couple hours during the night which is pretty annoying.

There are some pillow solutions that help separate the legs and align the spine and these can also help you put your arms in a more natural position.

[image from http://www.necksolutions.com/body-pillow.html]

Tossing & Turning

I’m not a doctor, but I’m guessing that the reason we toss and turn during the night is that our bodies tell us that we need to move based on circulation issues and such.  I wonder if astronauts toss and turn in zero-G at all.  I’m betting they do not because their body is in the natural position and their skin and muscles are not being compressed.  So how can we  minimize our skin and muscles being compressed down here on the ground?

[image from https://naturessleep.com/Blog/TabId/152/Month/6/Year/2012/Default.aspx]

I used to SCUBA dive quite a bit when I was younger.  When neutrally buoyant, you just float in mid-water so to speak.  You don’t rise or fall and there is nothing but your wet suit and SCUBA gear pressing on your skin.  I’ve wondered many times if it would be possible to sleep while neutrally buoyant under water.  That’s not very practical.  Not to mention quite dangerous.  But it would be an interesting experiment, I think.

[image from http://www.amberwavesdiving.com/scuba-school/advance-your-training]

Possible Solutions

By taking the underwater sleeping idea and making a more practical version of it, is there a way to make a micro-bead (styrofoam balls) sort of device or a gel filled device that would support your whole body and keep it in the natural posture while you sleep?  You would want to maximize the support in order to minimize the circulation issues and the tossing and turning problems.

Would it work to cut holes or slots in an existing mattress for the arms and legs to slide into?  Would it be too restrictive to try to sleep that way?  How could you get the feel and movement of water without actually being in water?

Is it more comfortable and natural to be leaning backwards in a recliner or leaning forwards face down?  Those portable massage chairs that are basically like a reverse recliner where you are actually face down in the chair with your face poking through a hole in the headrest seems like it might be close to a solution to the problem … as long as there was a way to maximize and spread out the support so that it would minimize the pressure on your skin and muscles.

[image from http://www.relaxforsuccess.com/55.html]

I believe a laid back solution is a snoring issue, but a face down solution at just the right angle just may be the thing that makes your body feel balanced.  If you leaned too far forward you would feel like you are falling and the blood would rush to your head, though.  It would have to be just the right angle leaning forward.  Would a combination of a modified face-down massage chair with lots of added memory foam or a gel material do the trick if it were tilted forward to just the right angle?

Are there any other ways to essentially hover a person in mid-air?  Think outside the box!  Come up with a solution!  Make millions of bucks!  I don’t want to necessarily become rich and famous, but I would like a good night’s sleep so I will definitely buy one if a solution is found!

Please invent this.  Thanks,
Kurt


GlowHost is an excellent website hosting provider

I’ve owned and operated the leucht.com domain and website since 1999 and over the years I’ve used numerous different companies as my hosting provider.  Without a doubt, the current GlowHost company is the best I’ve seen.  They have great prices and excellent technical support and also terrific online tools.

If you’re interested in starting your own website or if you’re interested in any of the other numerous services that GlowHost provides, just click on one of the banner ads below to get started.

Unlimted Disk, Transfer and Domains!

Here is my favorite GlowHost ad banner.  Very funny.


Thanks for visiting,
Kurt & Sam Leucht
Titusville, FL
http://www.leucht.com/
Email Us or Give Feedback!
(Report a Problem, Request a Feature)