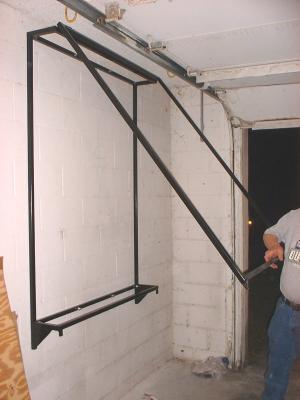
My magical disappearing workbench!

I designed, built, and installed this amazing disappearing workbench many many years ago when I first moved in to this house. I figure there might be someone out there who might be able to use this design for their own workbenches. First, lets look at the photos, then I’ll try to describe the design.

.01-disappearingworkbench.jpg .02-disappearingworkbench.jpg

You can see in the photos that there is a hinge on each leg of the workbench and also there are hinges along the back wall. So you just lift up the legs and the whole workbench swings down and against the wall and out of your way! Pretty cool, huh? I don’t have photos of the bench folded down because I rarely, if ever, actually fold mine down. I usually have too much stuff stored on top of it and also underneath it, so it’s not too convenient for me to fold mine down.

Basically, I created a box the size of the workbench top out of 2×4’s. Then I nailed some plywood to the box, then nailed a second piece of plywood just to make the top of the workbench extra tough. Then I mounted a 2×4 to the concrete block wall using some large heavy duty cement anchors and then connected the workbench top to the wall mounted 2×4 using heavy duty door hinges.

You can see in the second photo that I had to double up the box frame 2×4’s in the area where the legs are mounted to the box frame. The legs are mounted to this doubled up area using the same hinges. That’s about it. If I left out any important details, just email me using the link at the bottom of the page or reply to this blog entry and I will answer either way.

Kurt

Update: September 2012

Here are finally some more photos of the workbench design, including what it looks like when it is folded down.  I hope these photos show you how simple and awesome this workbench design is.

Kurt

Custom wall-mounted hurricane plywood storage rack

My stepdad is a professional welder. And one of the presents he gave me for Christmas 2004 was a heavy-duty custom wall-mounted plywood storage rack. It is deep enough to hold all of my hurricane plywood that I use to cover my windows. It’s a very nice design and I hope that some company out there will start selling these in your local home improvement store … at least in the Southeast US. 🙂

.01-kurtshurricaneplywoodrack.jpg .02-kurtshurricaneplywoodrack.jpg .03-kurtshurricaneplywoodrack.jpg

This is a placeholder for me to come back later and add detailed dimensions!!!!!!!

Kurt

Wall decor hanging tips

Have you ever put multiple nail holes in your wall in an effort to get a picture frame or a whole arrangement hung just perfectly? I’ll admit it … I’ve done this many times. But recently I’ve figured out an easier way…

Get some paper and some light tape that won’t hurt your wall finish. I used construction paper and regular old scotch tape. Make sure your paper color is easily visible against your wall color. Use the tape and the paper to make a template that is the same size as the item being hung. Lay your template over the back side of the item being hung. Then use your thumb to apply pressure over the hanging holes or whatever the mechanism is that is used to hang the item. This will make a dent in the template that you will use to drive the nails into the proper place into the wall. At this point, you can optionally push a nail through the template right where the top of the nail hole is in the item being hung.


Construction paper template with nail holes

After you’ve done this for all the items that are being hung, then you can temporarily tape all the templates up to your wall and move them around and figure out the best looking arrangement. Use a tape measure, a yardstick, a level, or just use your eyeball to get the templates exactly where you think they look the best.


Construction paper templates taped to the wall

Once you get the templates exactly where you want them, it’s time to pound some nails into the wall! Thanks to the quick and easy template method, we will only be putting nails exactly where we want them. Just use the template dents or the actual template nail holes that you created earlier to figure out exactly where the nails need to go.


Wall nailed through construction paper template

After all the nails are in, just peel away the paper templates and hang your stuff and you’re done! You now have a perfectly hung arrangement, no extra holes in the wall, and no frustration in your abilities to hang stuff in your house!

Final wall hanging

Sam


Thanks for visiting,
Kurt & Sam Leucht
Titusville, FL
http://www.leucht.com/
Email Us or Give Feedback!
(Report a Problem, Request a Feature)