Click here for the web page that details this project.

This was a pretty easy project and it only took a little bit of wood. And it makes a simple and family friendly game that will keep you and you entire family entertained for years to come!
By the way, it’s called cornhole. Wikipedia is never wrong … well, not for long anyways. 🙂
To make two standard sized cornhole boxes you will need a total of 4, 8 ft 2×4’s and a half sheet of 1/2 inch plywood. I suppose you could use 3/4 inch plywood, but the boxes are pretty heavy with 1/2 plywood, so anything more is probably overkill. It’s probably a good idea to pay a bit extra for higher quality plywood so that you get a nice and smooth surface that won’t affect your gameplay adversely.
The first step in construction is to build the frame. The final outside dimensions are 4 feet by 2 feet. So cut 2 of your 2x4s in half so you have 4 boards that are 48 inches long. Then make 4 more at 21 inches. The 21 inch piece plus 1.5, plus 1.5 gives you the 24 inches you need for the final dimension of 4 feet by 2 feet. Nail or screw the boards together as shown below. I prefer screws that are at least 2.5 or 3 inches long for strength and long lasting holding power. To keep the wood from splitting, it’s a good idea to drill smaller pilot holes first and then insert the screws into the pilot holes. The photo shows one frame, but you will need to make two.

Then cut your plywood into 24 inches by 48 inches and install it onto the frame. I put a little wood glue on the frame for good measure but that’s optional. I also used screws to hold the plywood down solidly. Make sure your nails or your screw heads are down even or slightly below the surface of the plywood. Otherwise your bags could get caught on them.

The next step is to cut a 6 inch diameter hole into your plywood. According to standards, the hole needs to be centered left to right and the center of the hole needs to be down 9 inches from the top of the box. The best way to cut this hole is to drill through first with a large drill bit and then cut it out using a jig-saw.

The legs are probably the hardest part of this build. But they’re really not too difficult, though. The final height of the top of the cornhole box off the ground needs to be 12 inches when it’s all said and done. But we will start with longer legs and then cut them to the proper length as the final step.
[the below steps need some photos for clarity]
[Place leg vertically in place with a spacer, and clamp. Measure center of frame and center of leg. Drill hole clear through both. Remove leg. Cut a roundover on leg. Install leg with bolt, washer, washer, locking nut.]
That’s it for construction! Now it’s time to paint your cornhole boxes. Make sure you use wood putty to cover up the screw holes so you will have a nice smooth surface for the bags to land on. I would suggest painting your boxes with a quality semi-gloss outdoor paint to give a smooth glassy surface.

That’s all it takes to make a sturdy set of cornhole boxes! Now you just need to buy a nice set of cornhole bags at your local WalMart store or Amazon or your favorite arts and crafts store.
Now here is a bonus storage idea for your new cornhole boxes. In my garage, the rafters are exposed and they are 24 inches on center. So the 48 inch long boards will span across three rafters. See the photo below for one end of the storage idea.

And here is a photo of the other end of the storage idea. The idea is that you slide the box all the way into this end of the storage and the other end of the box slides up past the other end of the storage which is just a hair wider then the 48 inch length of the box.

Then once the box is fully up, you just slide the box till it sets against the other end of the storage idea. Both ends of the box are then supported. It’s hard to explain in words, but when slid all the way in one direction, the box is fully supported but when slid all the way in the other direction the box can slip past the support and come down.

Here is a close up photo of one end of the support.

And here is a close up photo of the other end. Maybe these close up photos will help explain the concept.

For safety, it might be a good idea to clamp the box against the support so it won’t move over time and fall down.
So that’s it! Two cornhole boxes along with a creative overhead storage solution that keeps them up and out of the way while also allowing quick and easy acess to them when you want to use them!
Thanks for reading this article! Feel free to leave any feedback or comments below!
Kurt
I got a wild hair today and I built a house for my resident bats that do such a good job of keeping the mosquito population under control. Building a bat house is pretty easy and it only takes a few small pieces of wood. What follows are easy step by step instructions for building a small and simple bat house. It’s so easy you can do it yourself!
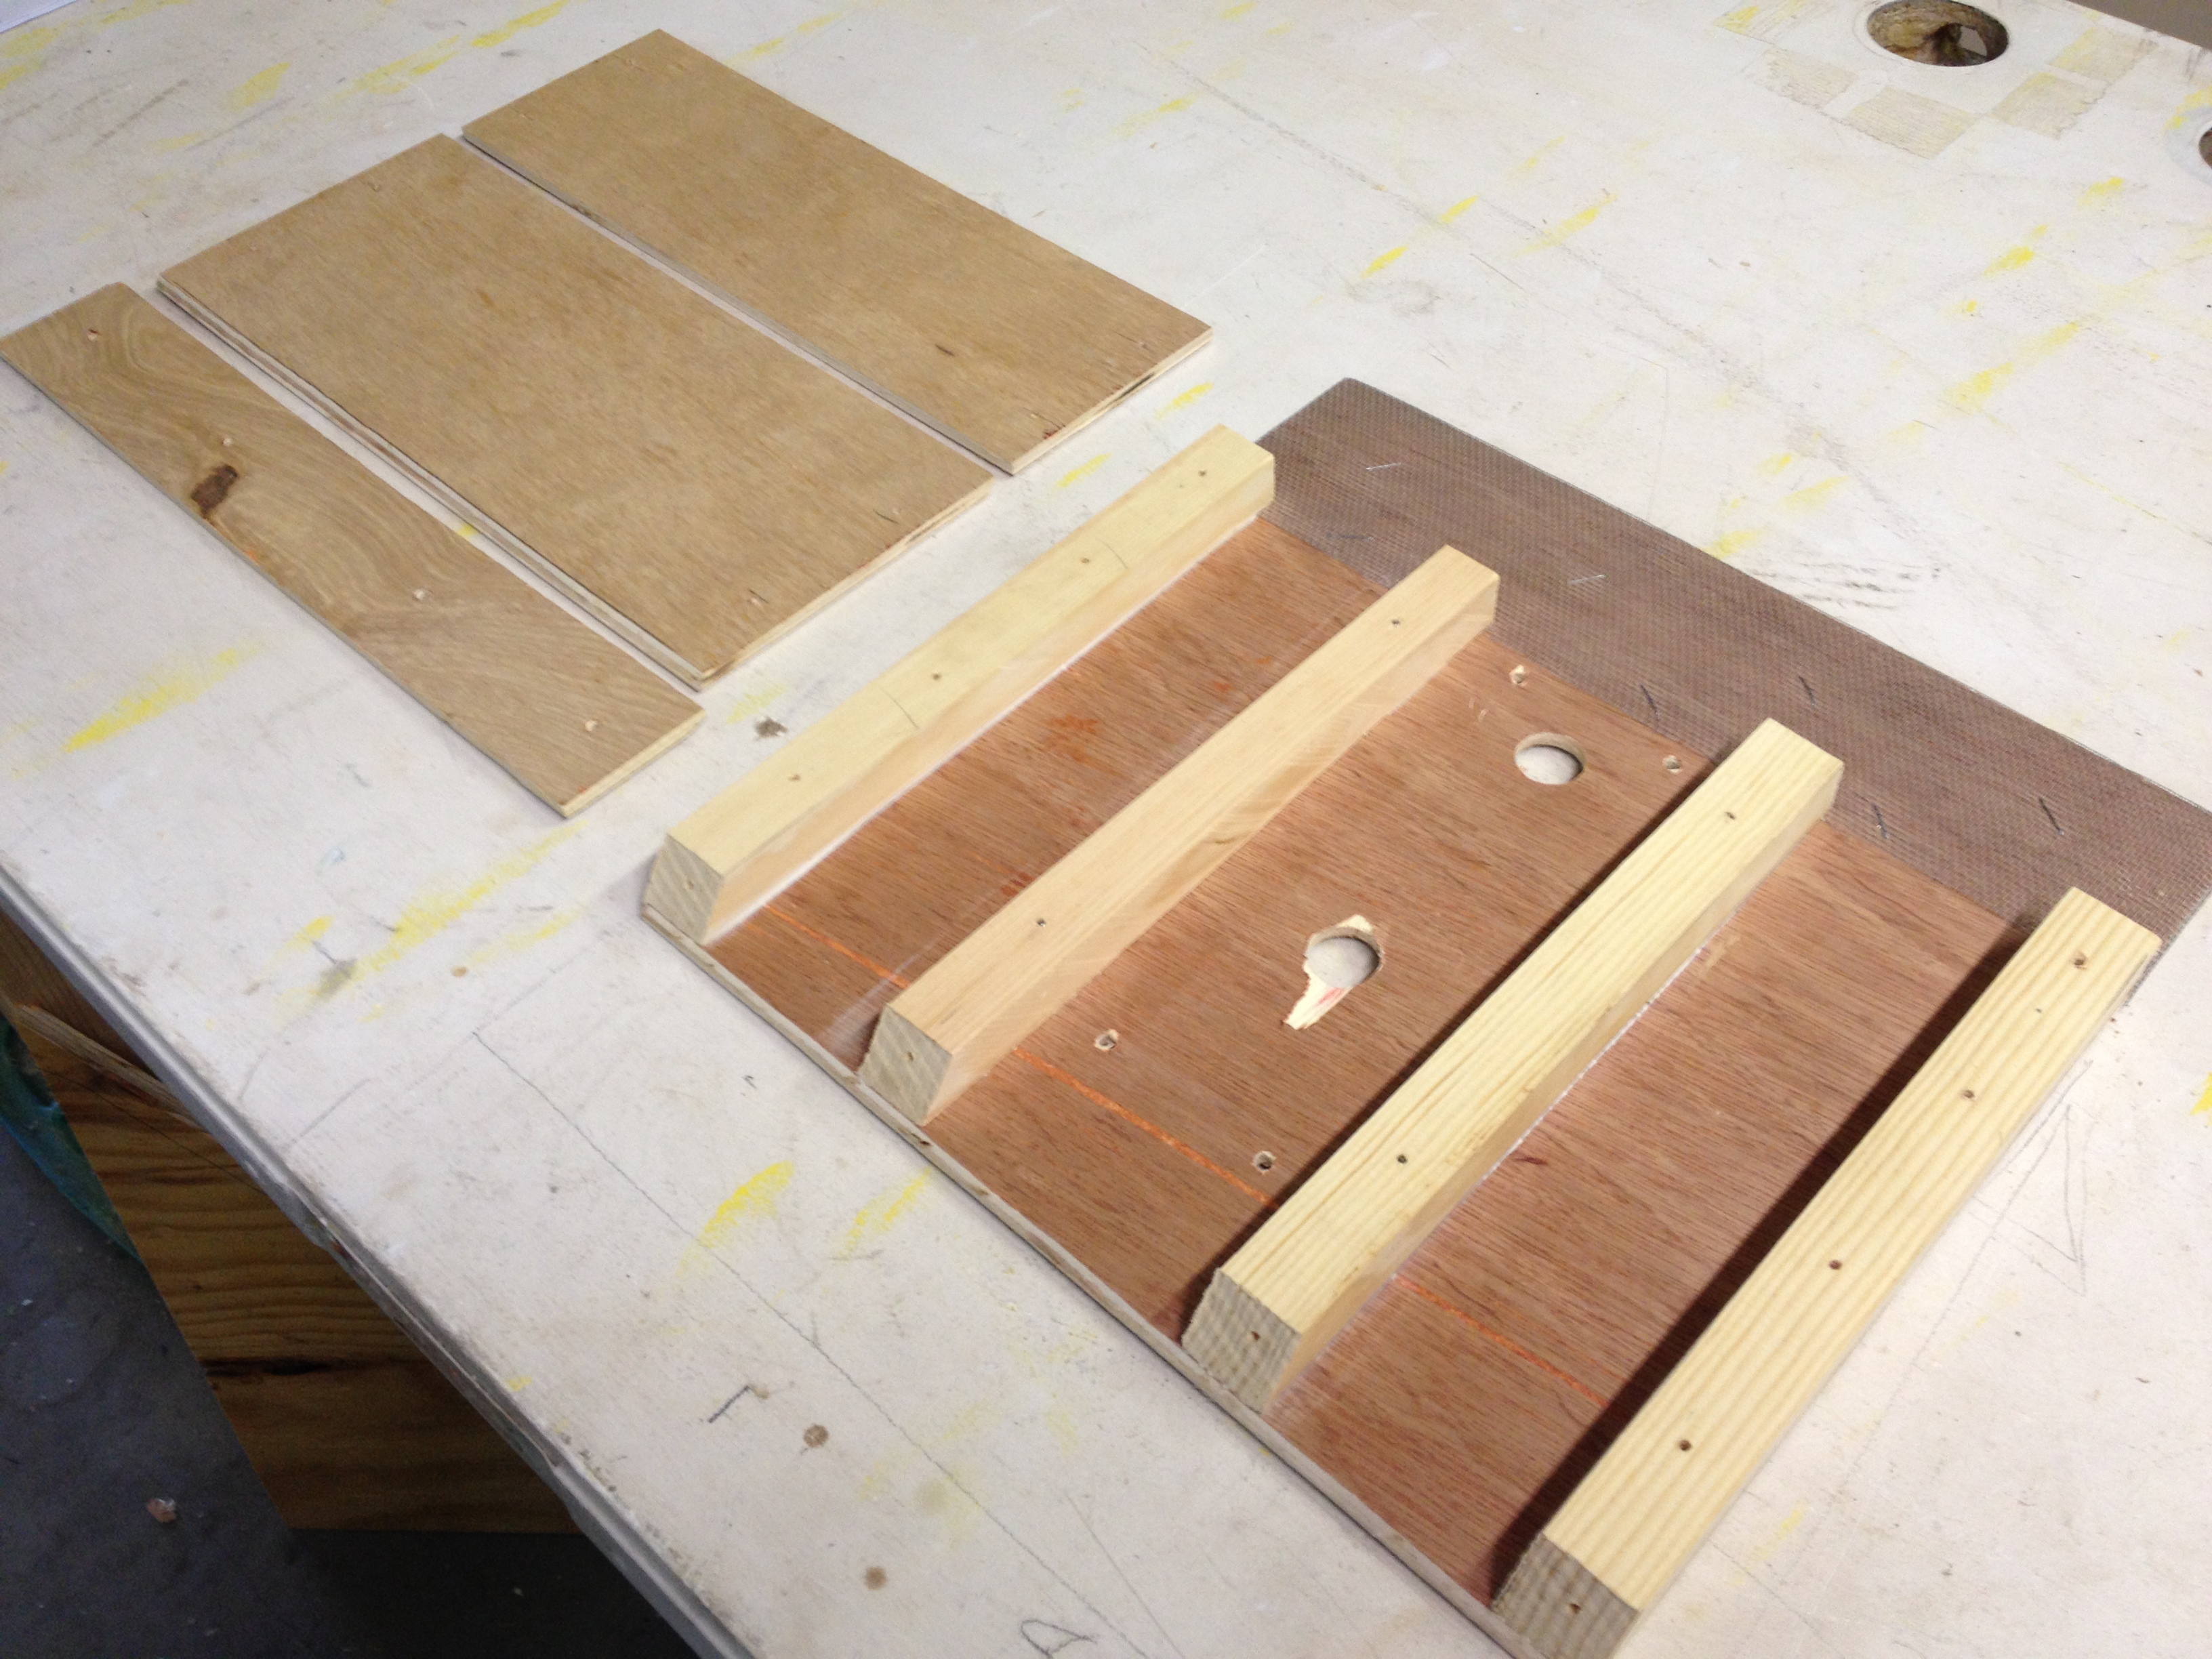
I searched the Internet for some plans and ended up drawing up my own design based on a few of the simpler designs that I found on the Internet. Here is a photo of my plans. (Click on any image to see the full resolution version.)

It might be hard to read, but basically it only takes a 12 inch by 12 inch piece of plywood for the back, plus a couple smaller plywood pieces for the front and one more for the roof, plus several thin slats. Here is a photo of all the wood for my bat house project, except for the roof, which I cut last after the rest was put together.

You can see the 12 by 12 plywood piece for the back, plus a 12 by 5 plywood piece and a 12 by 4 plywood piece for the front, plus 4 wood slats that are 1/2 inch by 1 inch and around 10 inches long. I cut the slats to their proper length during construction to fit the front of the house, so right now they are just a little long. The plywood I used was some thin veneer that I had laying around that was leftover from another project. But you can use plywood of any thickness for this project. The thickness of the front and back will determine the final size of the roof piece, so that’s one reason to cut that piece last.
The picture below shows one slat is cut along it’s short 1/2 inch side at an angle for the roof. I did not measure the angle … I just eyeballed it on my bandsaw. Then I took the one that I had cut and I used it as a template to draw the angle on the other three slats. That way they will all be the same angle.

The photo below shows all four slats laid out on the 12 by 12 back piece. You can also see a piece of screen that I had laying around that I cut to use as the landing pad for the bats. The bats need a surface to land on that they can hold onto with their tiny claws. A surface that is soft or rubbery or something like this screen will do fine.

Below you can see the front pieces laid down on the slats. Nothing is being attached together at this point. I am only test fitting everything to make sure it’s all the right size. The reason the front is in two pieces is that a bat house needs some ventilation in a way that does not allow rain to pour in.

Above you can see how the four spacer slats stick out beneath the front pieces. I marked them and cut them off and below you can see them now at the proper length.

Now that everything is verified to be the correct size, I’m ready to attach my landing pad. I used an office stapler to attach the screen to the plywood. In the photo below, you can see that I started on the back side and attached the screen. Then I rolled the screen around to the front side of the plywood and stapled it every couple of inches. I used staples because my material is metal screen. If you use foam matting or rubber matting or something like that, glue will probably work just fine.

Below you can see the landing pad completely installed from the front side where the bats will land.

Now it’s time to assemble the spacer slats onto the back plywood piece. I’m going to assemble the slats onto the plywood back now, but I will hold off assembling the front pieces and the roof. This is because the back needs to be installed onto my tall light pole first and then the front pieces and the roof can be installed. Otherwise, installation of the bat house on the light pole will be much harder after the whole thing is fully assembled. I used Liquid Nails to glue the wood pieces to each other. I also am going to use screws for good measure. This bat house will be outdoors and I want it to hold together for many years.

You can see below that I used wood clamps to hold the wood together tight and then I installed some screws. Between the glue and the screws, plus a coat of primer and a couple coats of outdoor latex paint, I’m hoping this bat house lasts for many many years.

Here it is on the light pole that I want it to be installed on. There were a couple bolts sticking out of the light pole that I had to accomodate. I’m going to put some smaller holes and then wrap picture wire around and around several times in order to hold the bat house in place on the round pole.

This photo shows the larger holes for the light pole bolts plus four smaller holes that I drilled for the picture wire.

Now I screwed the front pieces on, but I did not turn the screws down tight. I put the screws in just enough to make holes that I can find again later after it is painted.

Now I found a piece of plywood big enough to use as the roof. I cut it out and centered it in place and then I marked it’s final location as the photo below shows.

Then I laid the bat house next to the roof so I could mark where the slats are located so I can put screws through the roof directly into the center of these four slats.

Then I installed the roof, but not tight. Just to make screw holes that I can find again after it’s painted.

Now I took the front and roof pieces off again so I can paint everything separately.
Then I primered everything.

Then I painted everything. I actually put two nice thick coats of paint because I want this to be nice and waterproof and last for many years, hopefully. You don’t really want a bat house to be brightly colored. It should not really stand out. I had a dark brown paint handy so I used that. Painting through the screen was not easy, but I did it. Next time, I think I would probably paint the wood under the screen before installing the screen.

Then I hung the back piece as I described earlier using the picture wire to wrap around the pole several times.

Then I screwed the front pieces and the roof on. That’s all! The bat house is complete and ready for occupants!

Thanks for taking the time to read these step by step bat house directions! Let me know if you have any comments or feedback and definitely let me know if you used these directions to make your own bat house! Leave comments below on this blog post or send me an email by clicking the email link below in the page footer.
Thanks!
Kurt
Ever since we got our front loading washer and dryer a few years ago, we’ve been wanting to get some of those laundry pedestals to lift them up higher. But the pedestal units are pretty pricey. Those things are like $250 bucks … each. Ridiculous. So I decided I would make my own laundry pedestals out of wood that I had laying around in my shop. And I decided that I would design a pedestal that would include both a step stool and a storage drawer in one single unit. The step stool will help us reach the wall mounted cabinets that are mounted above our washer and dryer.
Click on any photo to view larger versions of it in my photo gallery.
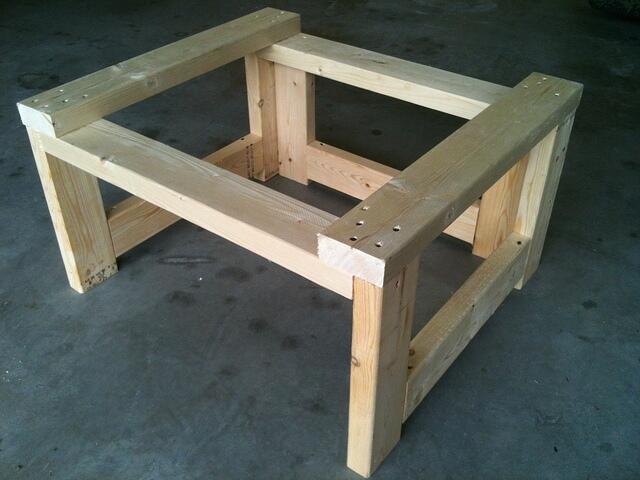
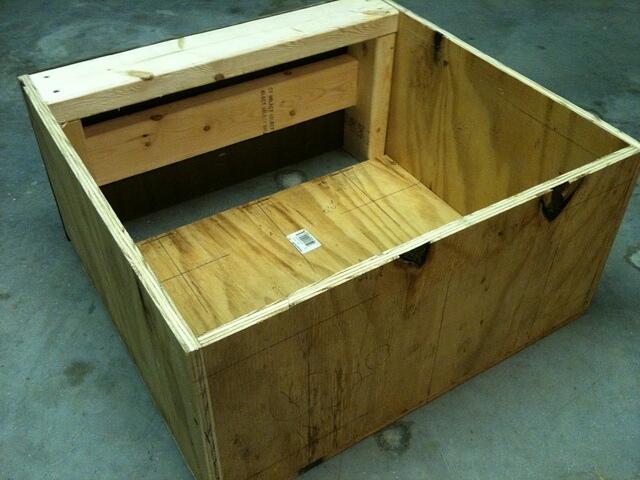
Here is a photo of the basic frame for my pedestal design. You can see that the front (facing down and to the left) is basically open to receive a drawer. The sides and back are solid enough to support a few hundred pounds (as long as the weight is directed down into the floor and focused at the four corners). All the cross beams are just there for stability. The four feet of the washer or dryer sit on the top-most two 2x4s.
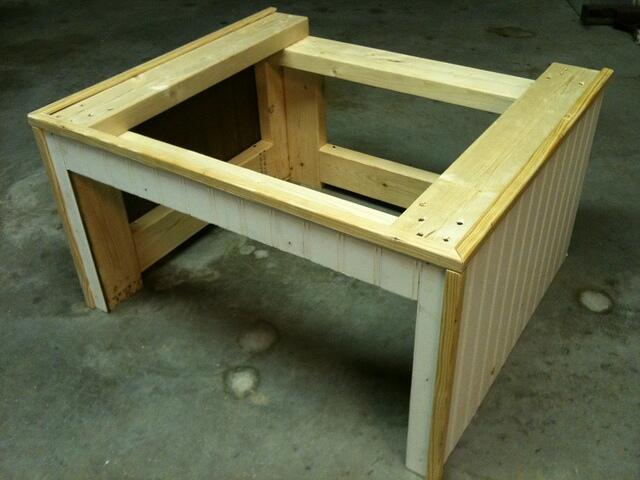
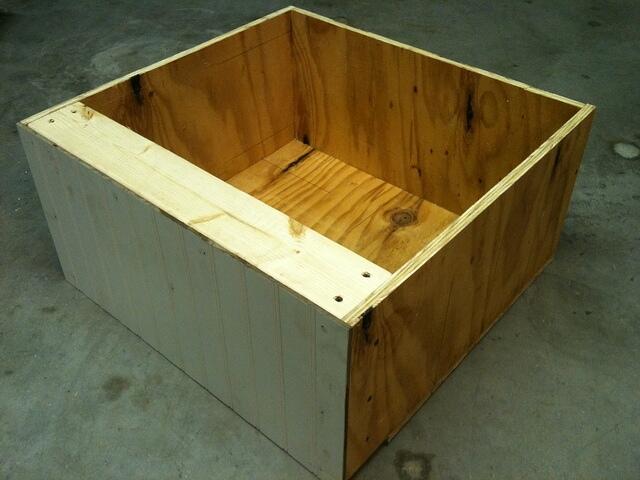
Here is the same basic frame after the decorative plywood and trim was applied. The back of the unit was left open and so was the top. That should allow for access to the bottom of the washer or dryer and access behind the unit if that access is ever needed.
I forgot to take photos of the drawer unit during construction, but this photo gives you a pretty good idea of it’s design. It’s fairly straightforward. The front of the drawer is on the upper left in this photo and contains the step stool portion which is made from 2x4s for strength. The horizontal 2×4 in the middle is both for stability and for mounting the pull handle. The rest of the drawer is made from plywood that I joined together with biscuit joints. The 4th sidewall is missing from this photo, but it fits right over the exposed 2x4s shown in this photo and creates a completely closed drawer bin used for storage.
Here is the same drawer from another angle. The front of the drawer has the decorative plywood.
And here is what the unit looks like with the drawer installed. I chose not to install a drawer slide. I just installed some felt pads underneath the drawer unit and it slides in and out just fine. The next step is to prime and paint to match the washer and dryer.

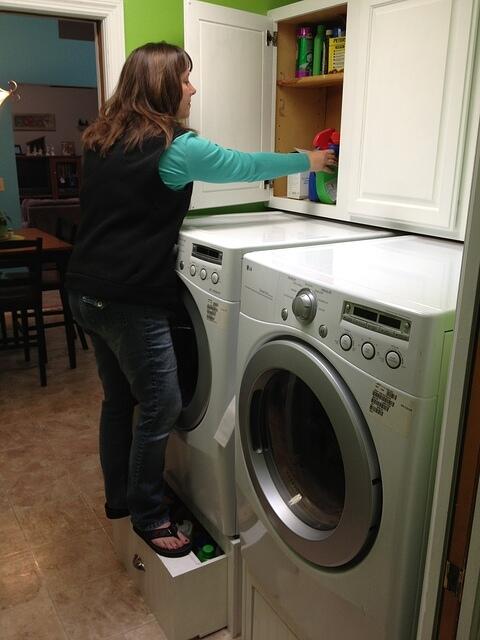
And here is what the finished laundry pedestal looks like in use in our laundry room. The drawer holds quite a bit of stuff and pulls out much farther than is shown in the photo below.

And the step-stool feature allows us to reach the wall mounted cabinets above our washer and dryer.
That’s about all the detail that I can think of. Add a comment below if you like this design or if you have any questions about details that I have left out. If you end up using my design for a laundry pedestal or if you have an ideas for improvements, please feel free to post in the comments below.
Kurt
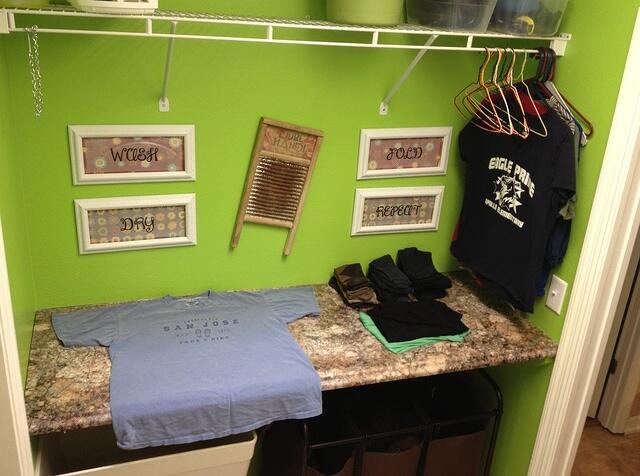
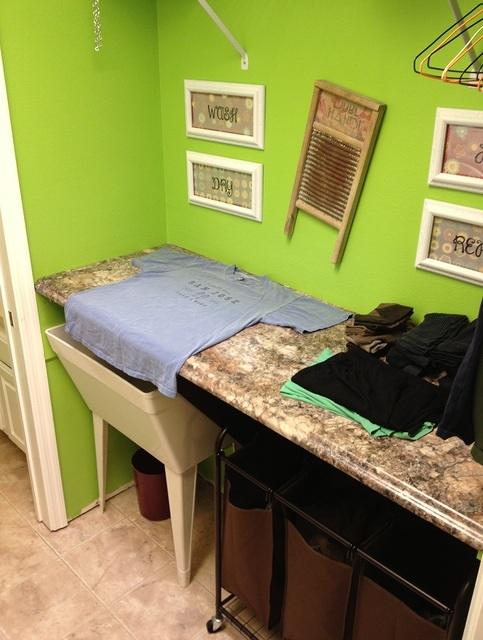
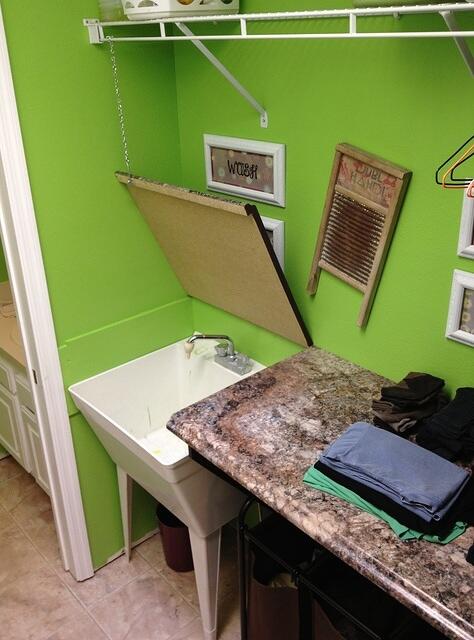
Little by little we are making small home improvements to our new house. Recently my lovely and talented wife came up with this amazing idea. It’s a countertop for our laundry room that is primarily used to fold clothes fresh out of the dryer. The most awesome and amazing part of her idea is that the countertop portion over the utility sink is hinged and folds up out of the way so we can use the sink. I liked the idea so much that I immediately started designing and creating it.
Here is a photo of the final product. The decorating ideas also came from my lovely and talented wife, by the way. Click on any photo to view larger versions of it in my photo gallery.
I bought the countertop from my local home improvement store and cut it down to the correct size using my table saw. This countertop looks like granite, but it is actually a pressboard or an MDF with a hard laminate on top. Here is the final product from another angle.
And here is what it looks like with the sink countertop opened up. I installed a chain and hook to hold the countertop up.
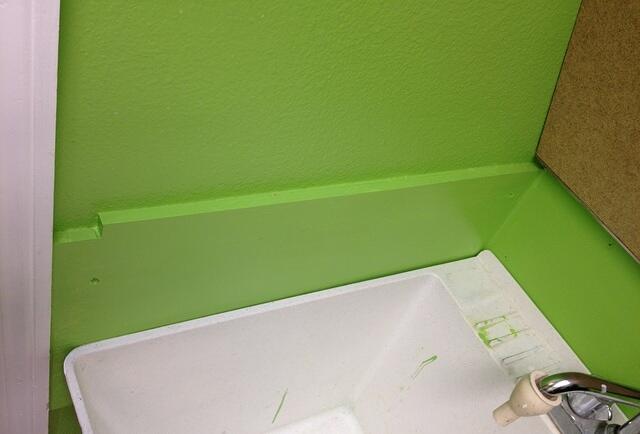
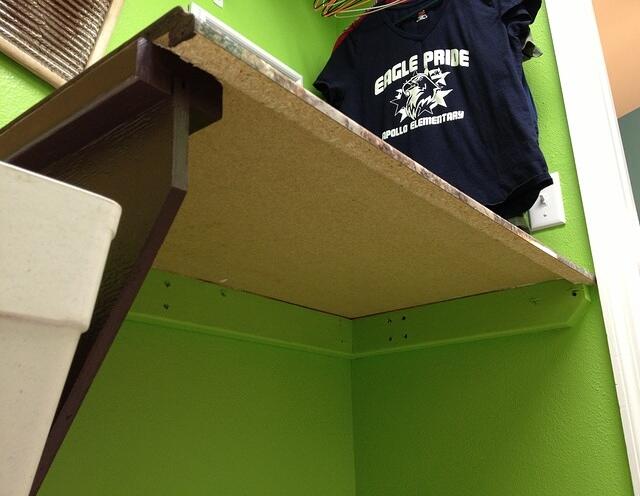
And below is some design detail of the hinged countertop. It’s pretty hard to see since the green paint pretty much blends together and hides detail, but the hinge is actually mounted to a piece of plywood that was mounted directly to the studs in the back wall. I cut out the drywall on the back wall and replaced the drywall with plywood that was about one eighth inch thinner than the drywall. That way the hinge would be set into the wall a bit in order to hide the hinge when looking from above with the countertop down.
Aside from being held up in the back by the hinge, the hinged countertop is held up on the left by another piece of plywood that is mounted on top of the drywall and provides a ledge for the countertop to rest on when closed. And on the right side, I created a bracket out of plywood and 2x4s that sticks out enough for the hinged countertop to rest on when closed.

Here is a better look at the plywood along the left side of the hinged countertop that it rests on when closed. It’s just plywood mounted on top of the drywall.
And here is a better look at the bracket that I created to hold up the countertop next to the sink. I notched the 2x4s so that the plywood would slide into them and hold firmly. I glued and screwed the plywood into the notches from the back side and then mounted the whole thing to the wall.
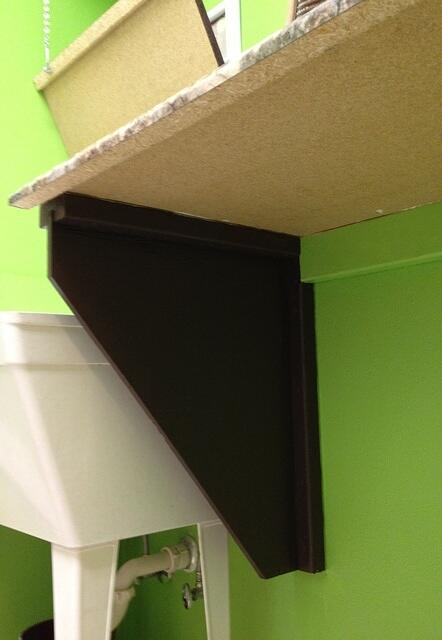
And here is a reverse angle showing a close up of the bracket plus you can see how I used 2x4s under the other portions of the countertop to hold it up. When installing something like this which is fairly heavy, it’s important to screw into wall studs. Otherwise, the weight could pull the whole thing right off the wall.
That’s about all the detail that I can think of. Add a comment below if you like this design or if you have any questions about details that I have left out.
Kurt
|
|
Thanks for visiting, Kurt & Sam Leucht Titusville, FL |
http://www.leucht.com/ Email Us or Give Feedback! (Report a Problem, Request a Feature) |