Category Archives: Health, Home, Property, Safety

Acme Catapult is for sale!

Are you or someone you know looking for a fun hobby for yourself and a few buddies?

Acme Catapult is officially for sale!  

After 18 years of catapulting adventures, Bob and Doug have decided to retire from chuckin.  The ACME Catapult, Bambulance, and all equipment and spare parts are for sale. It was a tough year long decision, but its time to let fresh blood carry on and even set new records.

Please note: this is an extreme hobby, but one that can pay for itself if you promote the machine and are willing to travel a little. They have done many “For Hire” events in addition to several TV appearances.  What sets this machine apart is its awesome strength.  It can easily hurl objects up to 200 pounds and can set, fire and reset every 15 minutes all day long.

They are selling the entire package; all spare parts, including over 80 springs, two throwing arms, two complete hydraulic power units, hyd. hoses, extra cables, numerous bags and slings, ladders, tool boxes, and tools, etc.

Please call Bob 309-202-0676 or Doug 309-712-2278 for more information.

http://www.acmecatapult.com/

[The ACME Catapult is the tandem axle monster pumpkin catapult machine that was seen on national television throwing lawn equipment high into the air on ABC’s “My Kind of Town” and also hurling large appliances on NBC’s “The Tonight Show with Jay Leno”.  You may have also seen it tossing pumpkins on the TLC Special “Punkin Chunkin”, which was filmed at the 2002 World Championship Punkin Chunkin competition in Delaware.  The ACME Catapult team started in 1996 with a much smaller catapult designed to throw pumpkins at a local Pumpkin Festival Contest. Since then the catapult has grown into a tandem axle monster capable of hurling refrigerators and lawn tractors high into the air, or throwing a ten-pound pumpkin 2000 feet!]

Thanks,

Kurt


Chain swing installed into tree limb

A while back I installed a standard hanging chain swing from a nice big limb in the oak tree in my front yard. I found these nice heavy duty swiveling swing hangers at WalMart. They just screw right into the tree limb or into a wooden swing set.

IMG_1395

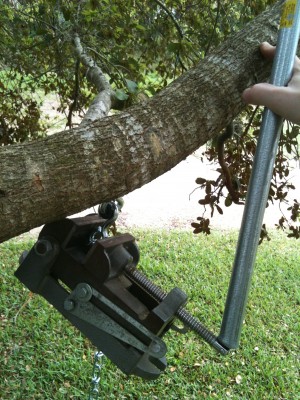
My problem became how do I close the loop on this swing hanger after I have inserted the chain from the swing? I suppose I could just keep the loop open, but that would risk kids flying off and hurting themselves while swinging.  Probably not too likely, but still a risk.  The solution was sitting on my drill press in my shop. It’s my handy dandy portable drill press vice.

IMG_1396

To get leverage and close the small portable vice onto the hanger’s loop, I used a piece of pipe.

IMG_1399

Perfect!

IMG_1402

Fix Your Loose Shifter With Booger Bushings

I have a 2005 PT Cruiser that I bought used about 4 years ago.  (http://www.leucht.com/blog/2009/06/kurts-new-car-pt-cruiser/)  The manual 5-speed shifter was fairly loose compared to any of my previous vehicles, but it seemed to work fine so I didn’t worry about it.  Over the past couple years I feel like the shifter has been getting looser over time, so I knew that something was going to give someday.  Then suddenly I could not get it to go into reverse.

My brother in law pointed me to a website, http://www.boogerracing.com/ where they sell transmission bushings called Booger Bushings that were advertised to fix me right up.  A set of replacement bushings cost only $22, including shipping.  According to the website, these bushings are “injection molded polyurethane with a proprietary molded-in lubricant”.  They claim to be significantly stiffer than the stock bushings but are not a “solid” bushing.  Before I bought these on the Internet, I checked with my local auto parts store and they did not sell the bushings separately from the shifter cables, which ran a couple hundred bucks.

0

The shifter cables attach to the transmission underneath the air filter housing in the PT Cruiser.  Luckily, they are very easy to get to.  Just remove the air filter lid and disconnect the big hose exiting the air filter housing.  There is also a small hose that needs to be removed from the air filter housing.  Then just lift the whole air filter housing up, rocking it as you tug.  It’s held down only by the friction of some feet sticking through some rubber grommets.  Very simple.

1

Now, to get the metal bracket out of the way a bit, just remove the two bolts holding it down.  It’s easiest to use a ratchet with a long extension for this.  This allows you to slide the bracket to the left a few inches to reveal the shifter cable underneath.  Now you should be able to clearly see both shifter cable ends along with the bad or missing bushings.  In my case, both of the old bushings were completely gone.  That explains how I suddenly lost the ability to shift into reverse.  Remove the old bushings if they are still there.

2

The Booger Bushings are designed with a lip at the top that snaps very solidly onto the slot of the transmission shaft.  As a matter of fact, they are so tight to snap on, that the manufacturer suggests that you put a dab of grease inside to assist in the installation.  This photo is looking at the lip from the bottom of the bushing.

3

Simply slide the bushing onto the cable end.  The white in the next few photos is a bit of white lithium grease that I added to help with the installation of the bushing onto the slot of the transmission shaft.

4

5

And pop it onto the transmission shaft.  Use both thumbs and push down hard until it snaps into place.

6

7

It’s as easy as that.  There are also two bushings under the shifter in the cabin.  But I did not change those out yet, since these two bushings seems to have tightened it right up and it is a bit more work to get to those bushings under the center console.  I will definitely tear into it and change those out if I feel the stick getting loose, though.

After installing Booger Bushings, it will feel like you have a brand new car if you’ve been driving around with a loose shifter for a while, like I had been doing.  Now my transmission feels tight like I’m driving a race car.  And it only cost me about 20 bucks and less than an hour’s worth of work!  Thanks Booger Racing!

Kurt


Custom built wood washer and dryer shelves

Ever since we got our front loading washer and dryer a few years ago, we’ve been wanting to get some of those laundry pedestals to lift them up higher.  But the pedestal units are pretty pricey.  Those things are like $250 bucks … each.  Ridiculous. So I decided I would make my own laundry pedestals out of wood that I had laying around in my shop.  And I decided that I would design a pedestal that would include both a step stool and a storage drawer in one single unit. The step stool will help us reach the wall mounted cabinets that are mounted above our washer and dryer.

Click on any photo to view larger versions of it in my photo gallery.

Here is a photo of the basic frame for my pedestal design.  You can see that the front (facing down and to the left) is basically open to receive a drawer.  The sides and back are solid enough to support a few hundred pounds (as long as the weight is directed down into the floor and focused at the four corners).  All the cross beams are just there for stability.  The four feet of the washer or dryer sit on the top-most two 2x4s.

Here is the same basic frame after the decorative plywood and trim was applied.  The back of the unit was left open and so was the top.  That should allow for access to the bottom of the washer or dryer and access behind the unit if that access is ever needed.

I forgot to take photos of the drawer unit during construction, but this photo gives you a pretty good idea of it’s design.  It’s fairly straightforward.  The front of the drawer is on the upper left in this photo and contains the step stool portion which is made from 2x4s for strength.  The horizontal 2×4 in the middle is both for stability and for mounting the pull handle.  The rest of the drawer is made from plywood that I joined together with biscuit joints.  The 4th sidewall is missing from this photo, but it fits right over the exposed 2x4s shown in this photo and creates a completely closed drawer bin used for storage.

Here is the same drawer from another angle.  The front of the drawer has the decorative plywood.

And here is what the unit looks like with the drawer installed.  I chose not to install a drawer slide.  I just installed some felt pads underneath the drawer unit and it slides in and out just fine.  The next step is to prime and paint to match the washer and dryer.

And here is what the finished laundry pedestal looks like in use in our laundry room.  The drawer holds quite a bit of stuff and pulls out much farther than is shown in the photo below.

And the step-stool feature allows us to reach the wall mounted cabinets above our washer and dryer.

That’s about all the detail that I can think of.  Add a comment below if you like this design or if you have any questions about details that I have left out.  If you end up using my design for a laundry pedestal or if you have an ideas for improvements, please feel free to post in the comments below.

Kurt

Laundry folding countertop hinges open to reveal utility sink

Little by little we are making small home improvements to our new house.  Recently my lovely and talented wife came up with this amazing idea.  It’s a countertop for our laundry room that is primarily used to fold clothes fresh out of the dryer.  The most awesome and amazing part of her idea is that the countertop portion over the utility sink is hinged and folds up out of the way so we can use the sink.  I liked the idea so much that I immediately started designing and creating it.

Here is a photo of the final product.  The decorating ideas also came from my lovely and talented wife, by the way.  Click on any photo to view larger versions of it in my photo gallery.

I bought the countertop from my local home improvement store and cut it down to the correct size using my table saw.  This countertop looks like granite, but it is actually a pressboard or an MDF with a hard laminate on top.  Here is the final product from another angle.

And here is what it looks like with the sink countertop opened up.  I installed a chain and hook to hold the countertop up.

And below is some design detail of the hinged countertop.  It’s pretty hard to see since the green paint pretty much blends together and hides detail, but the hinge is actually mounted to a piece of plywood that was mounted directly to the studs in the back wall.  I cut out the drywall on the back wall and replaced the drywall with plywood that was about one eighth inch thinner than the drywall.  That way the hinge would be set into the wall a bit in order to hide the hinge when looking from above with the countertop down.

Aside from being held up in the back by the hinge, the hinged countertop is held up on the left by another piece of plywood that is mounted on top of the drywall and provides a ledge for the countertop to rest on when closed.  And on the right side, I created a bracket out of plywood and 2x4s that sticks out enough for the hinged countertop to rest on when closed.

Here is a better look at the plywood along the left side of the hinged countertop that it rests on when closed.  It’s just plywood mounted on top of the drywall.

And here is a better look at the bracket that I created to hold up the countertop next to the sink.  I notched the 2x4s so that the plywood would slide into them and hold firmly.  I glued and screwed the plywood into the notches from the back side and then mounted the whole thing to the wall.

And here is a reverse angle showing a close up of the bracket plus you can see how I used 2x4s under the other portions of the countertop to hold it up.  When installing something like this which is fairly heavy, it’s important to screw into wall studs.  Otherwise, the weight could pull the whole thing right off the wall.

That’s about all the detail that I can think of.  Add a comment below if you like this design or if you have any questions about details that I have left out.

Kurt